For PM company teams onboarding to RentBamboo.
This guide explains every part of the HubSpot sync - what it does, how to set it up, and what to do when something breaks.
RentBamboo uses the term "Lead," while HubSpot uses "Contact." In this guide, these terms refer to the same entity.
HubSpot sync moves leads between RentBamboo and HubSpot CRM in both directions.
Direction
What happens
Import | HubSpot contacts → RentBamboo leads |
Export | RentBamboo leads → HubSpot contacts |
Two-way sync | Changes in HubSpot update RB leads automatically via webhooks |
Auto-sync | Scheduled polling sync on a configurable interval |
This is the most important concept - read it twice.
RentBamboo does NOT use a shared HubSpot app. Every team must create their own HubSpot app and provide four credentials. This means:
Each team manages their own OAuth tokens
Each team has their own webhook subscriptions tied to their own app
One team's connection does not affect another team's connection
Data never flows through RentBamboo's infrastructure in the wrong direction
The four credentials every team needs:
Credential Found Where Notes
| Your HubSpot app settings | Public, safe to share |
| Your HubSpot app settings | Keep secret |
| Your HubSpot app settings | Numeric ID (e.g. |
| Keep secret - different from clientSecret |
⚠ The
developerApiKey(hapikey) is used exclusively for webhook management. It is NOT the same as your OAuth client secret. This is the main for sync.To make this setup 10x simple, follow the steps below.
If you have an existing HubSpot account, you might be familiar with this developer option on your left, click it
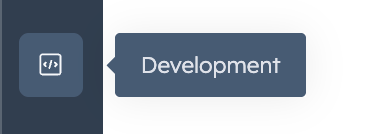
If you don't already have one:
Go to developers.hubspot.com
Sign up / log in
You need a Developer Portal (separate from your CRM portal)
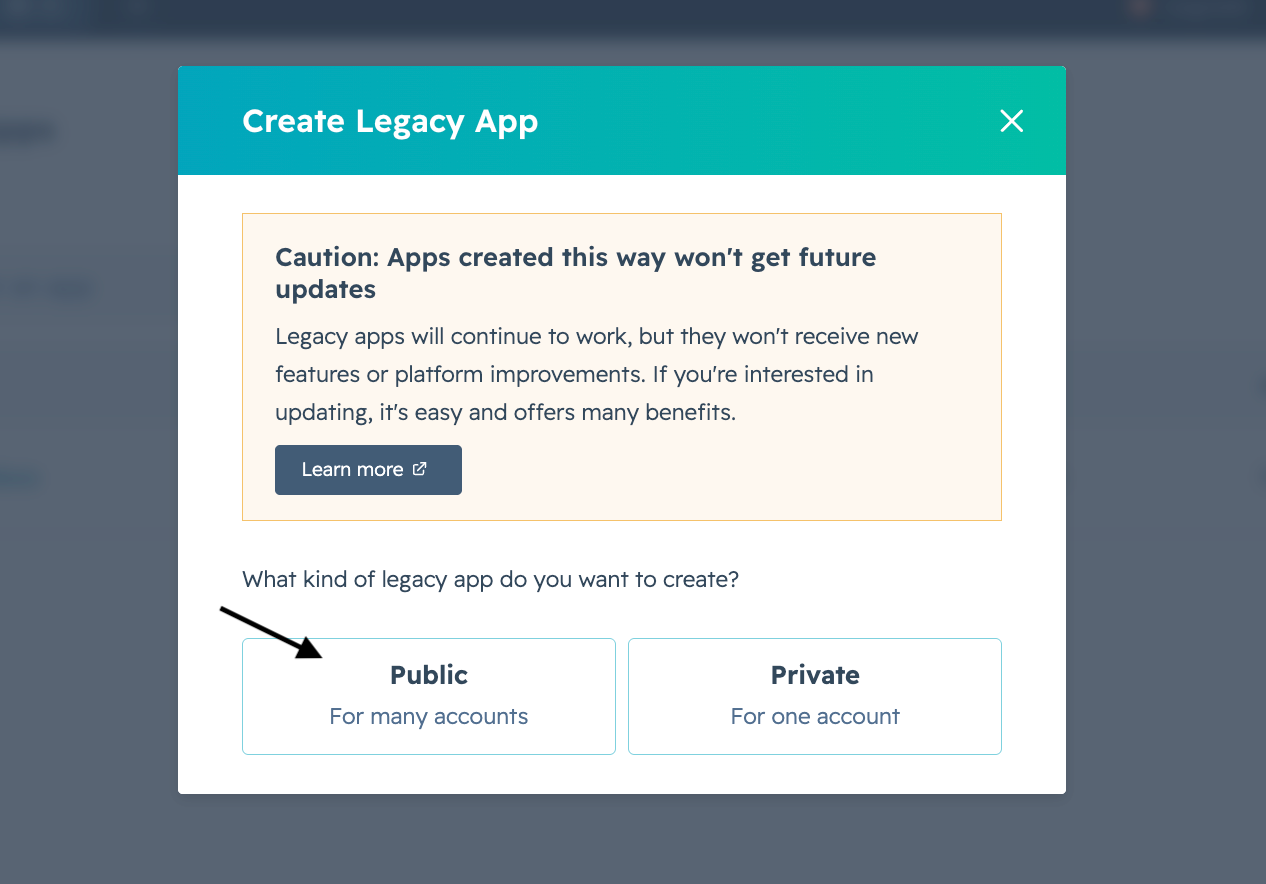
In your Developer Portal, go to Legacy Apps and click Create legacy app
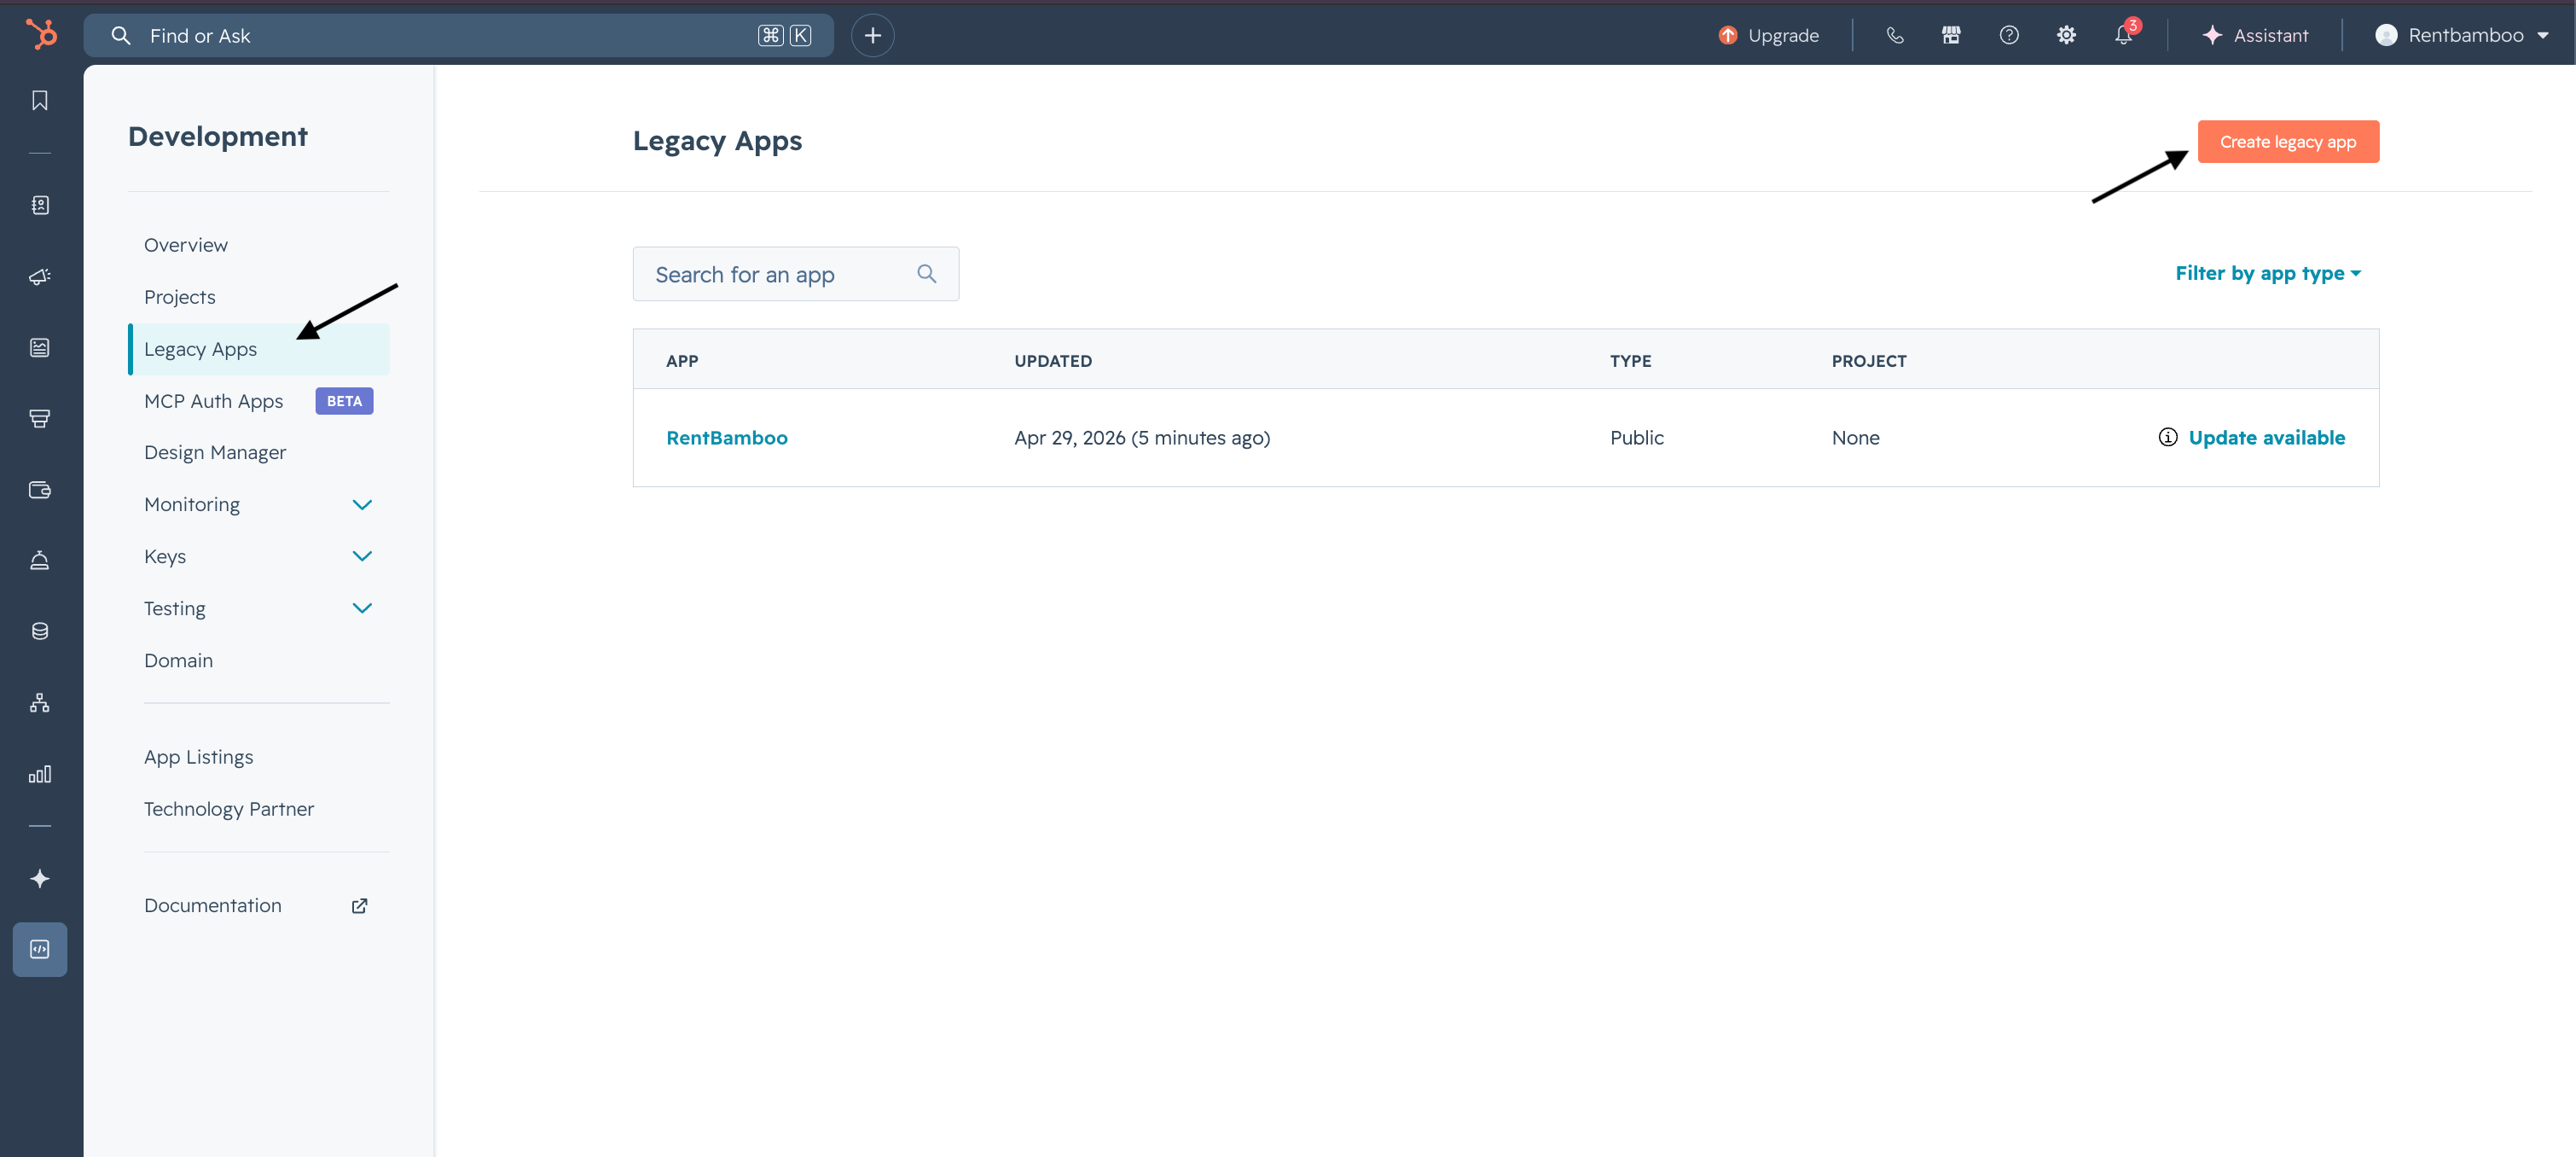
Choose the Public option
Give it a name like "RentBamboo" or "Rentbamboo - [Your Company]" and leave the description blank or write something simple
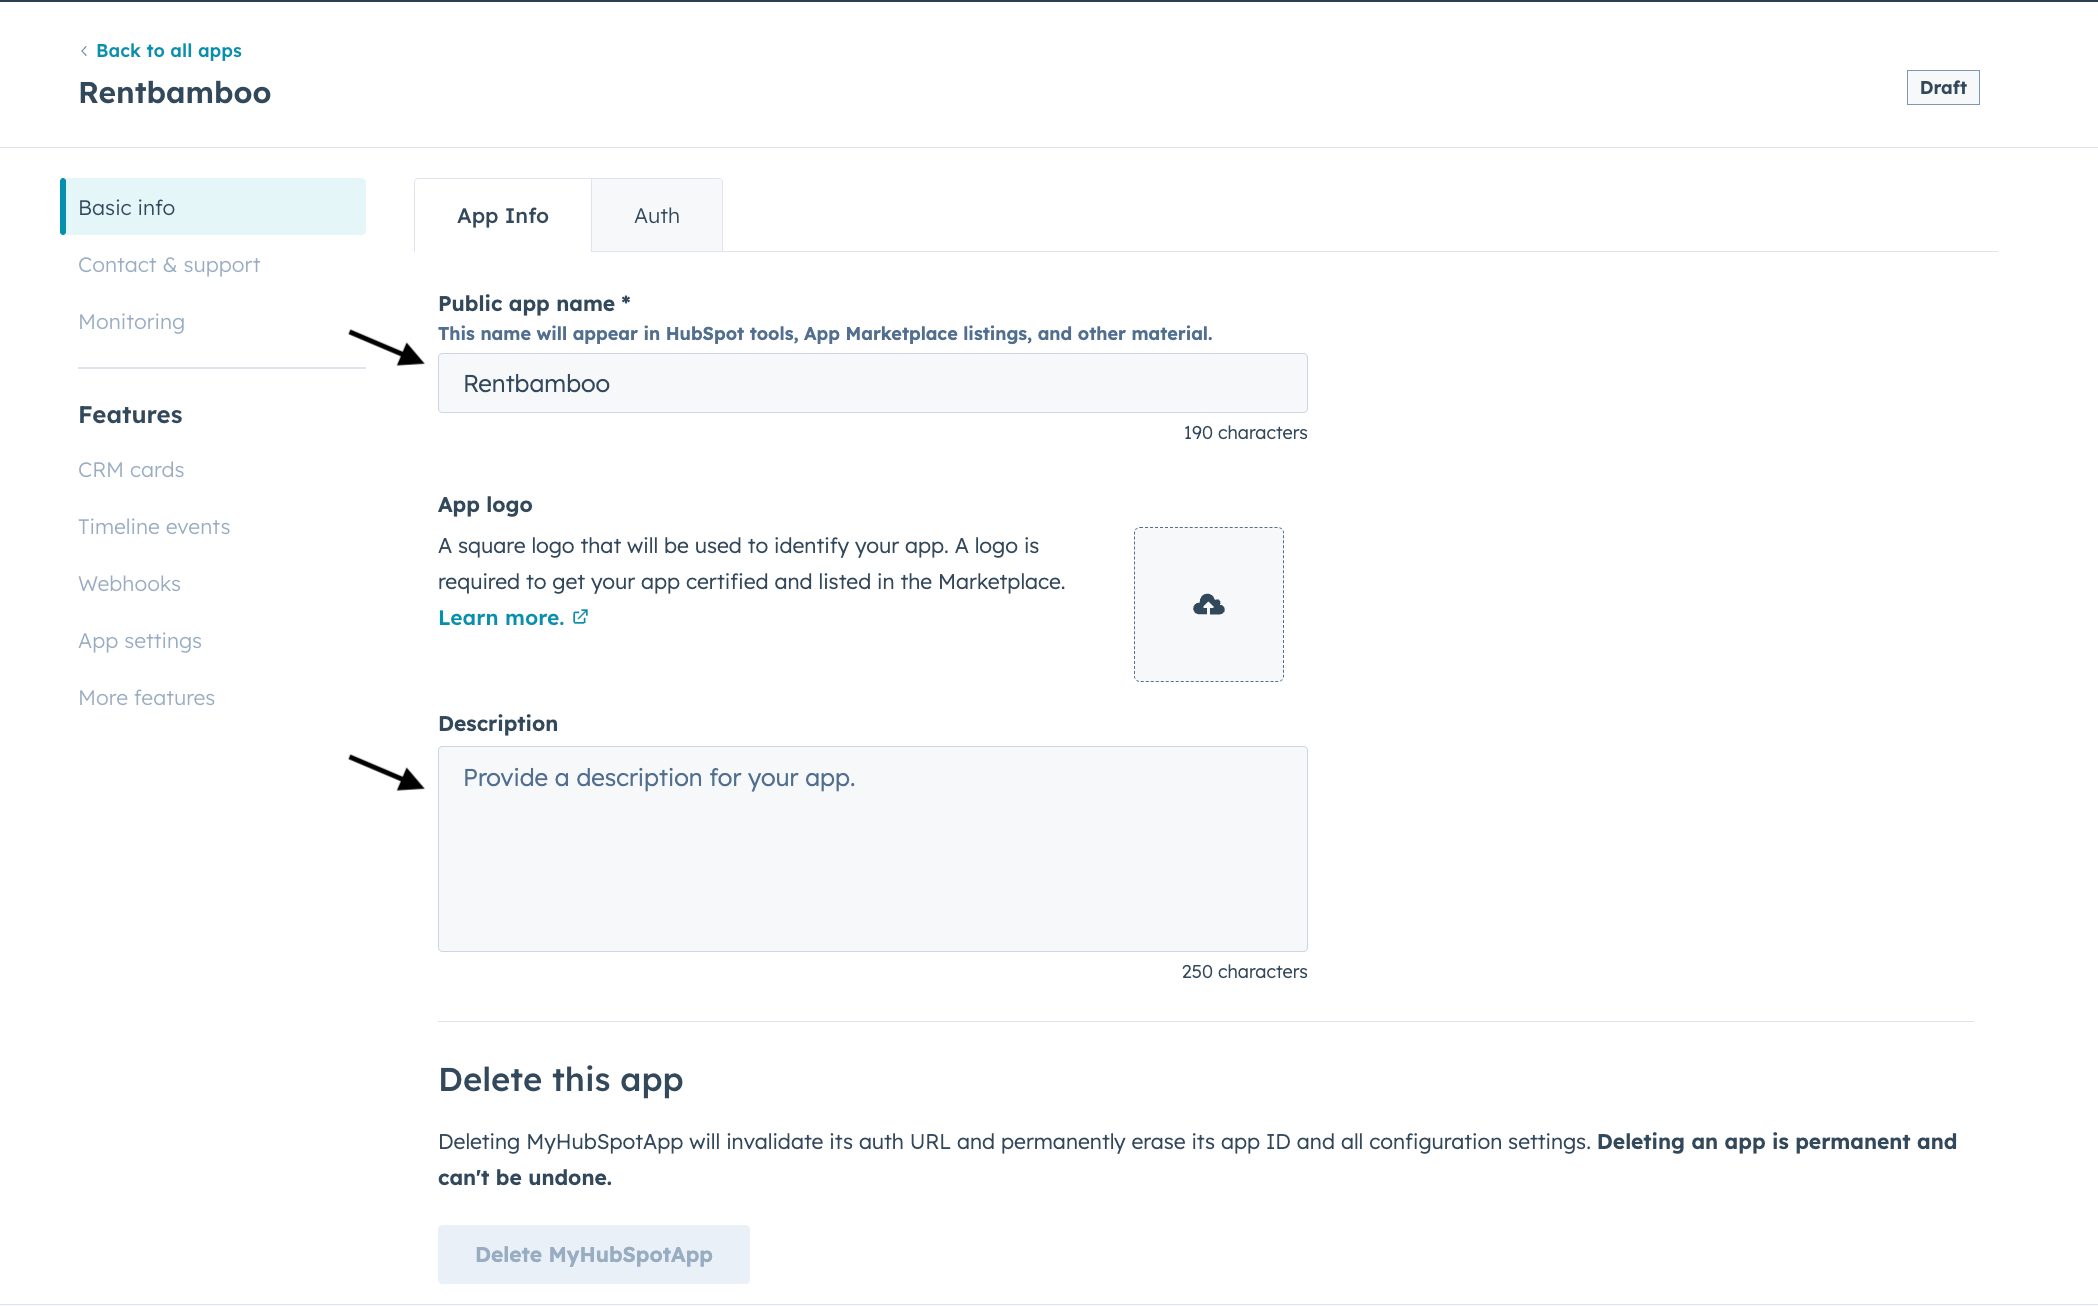
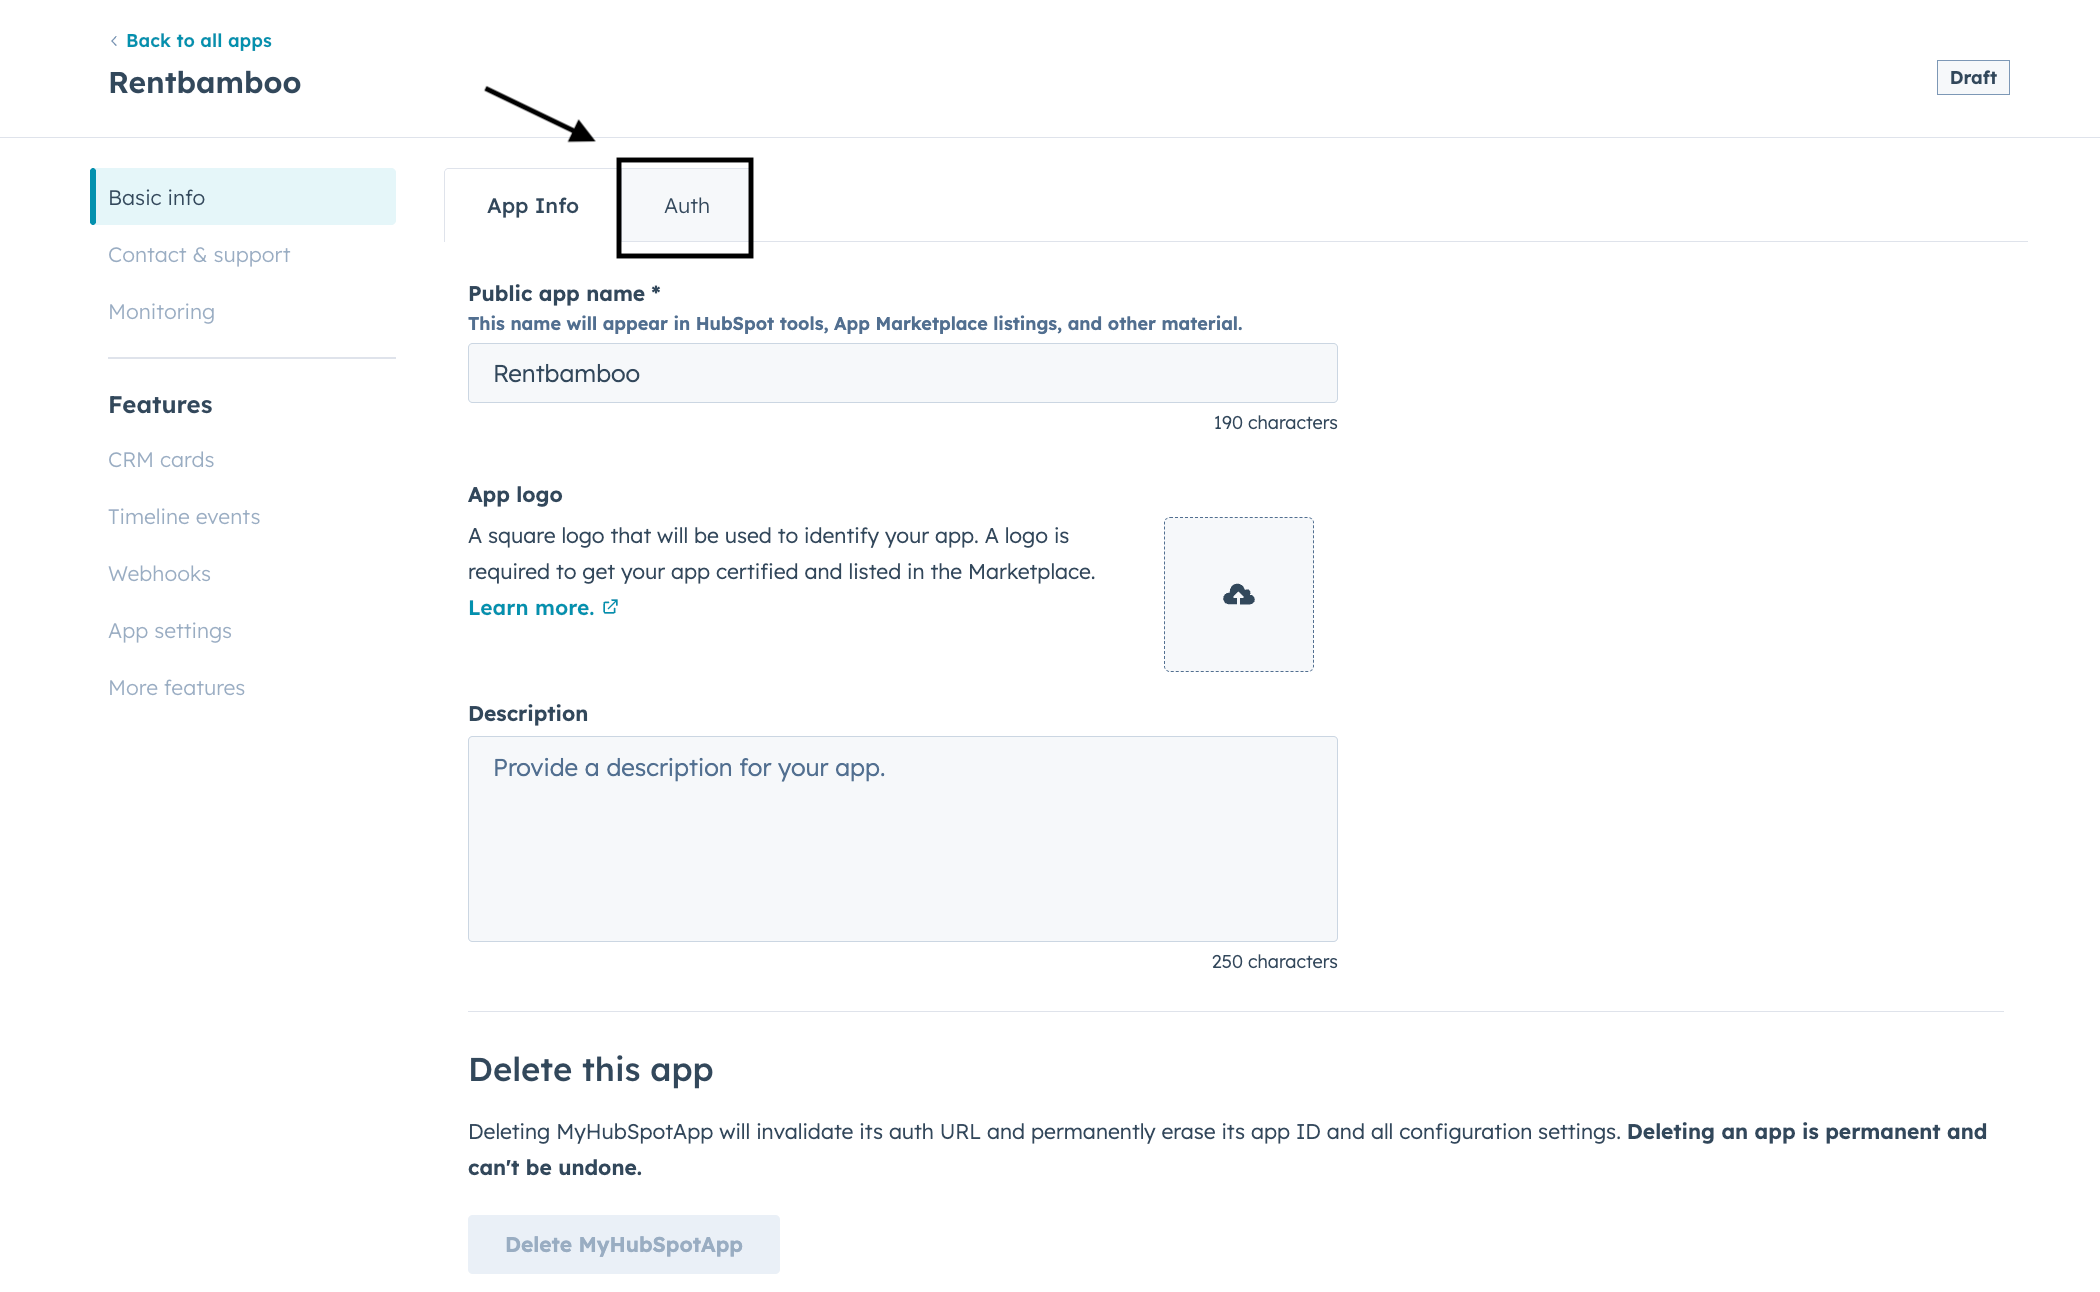
Next, click on the Auth tab.
Scroll down the Auth tab to find Redirect URL, and set the URL to: https://www.rentbamboo.com/api/hubspot/callback
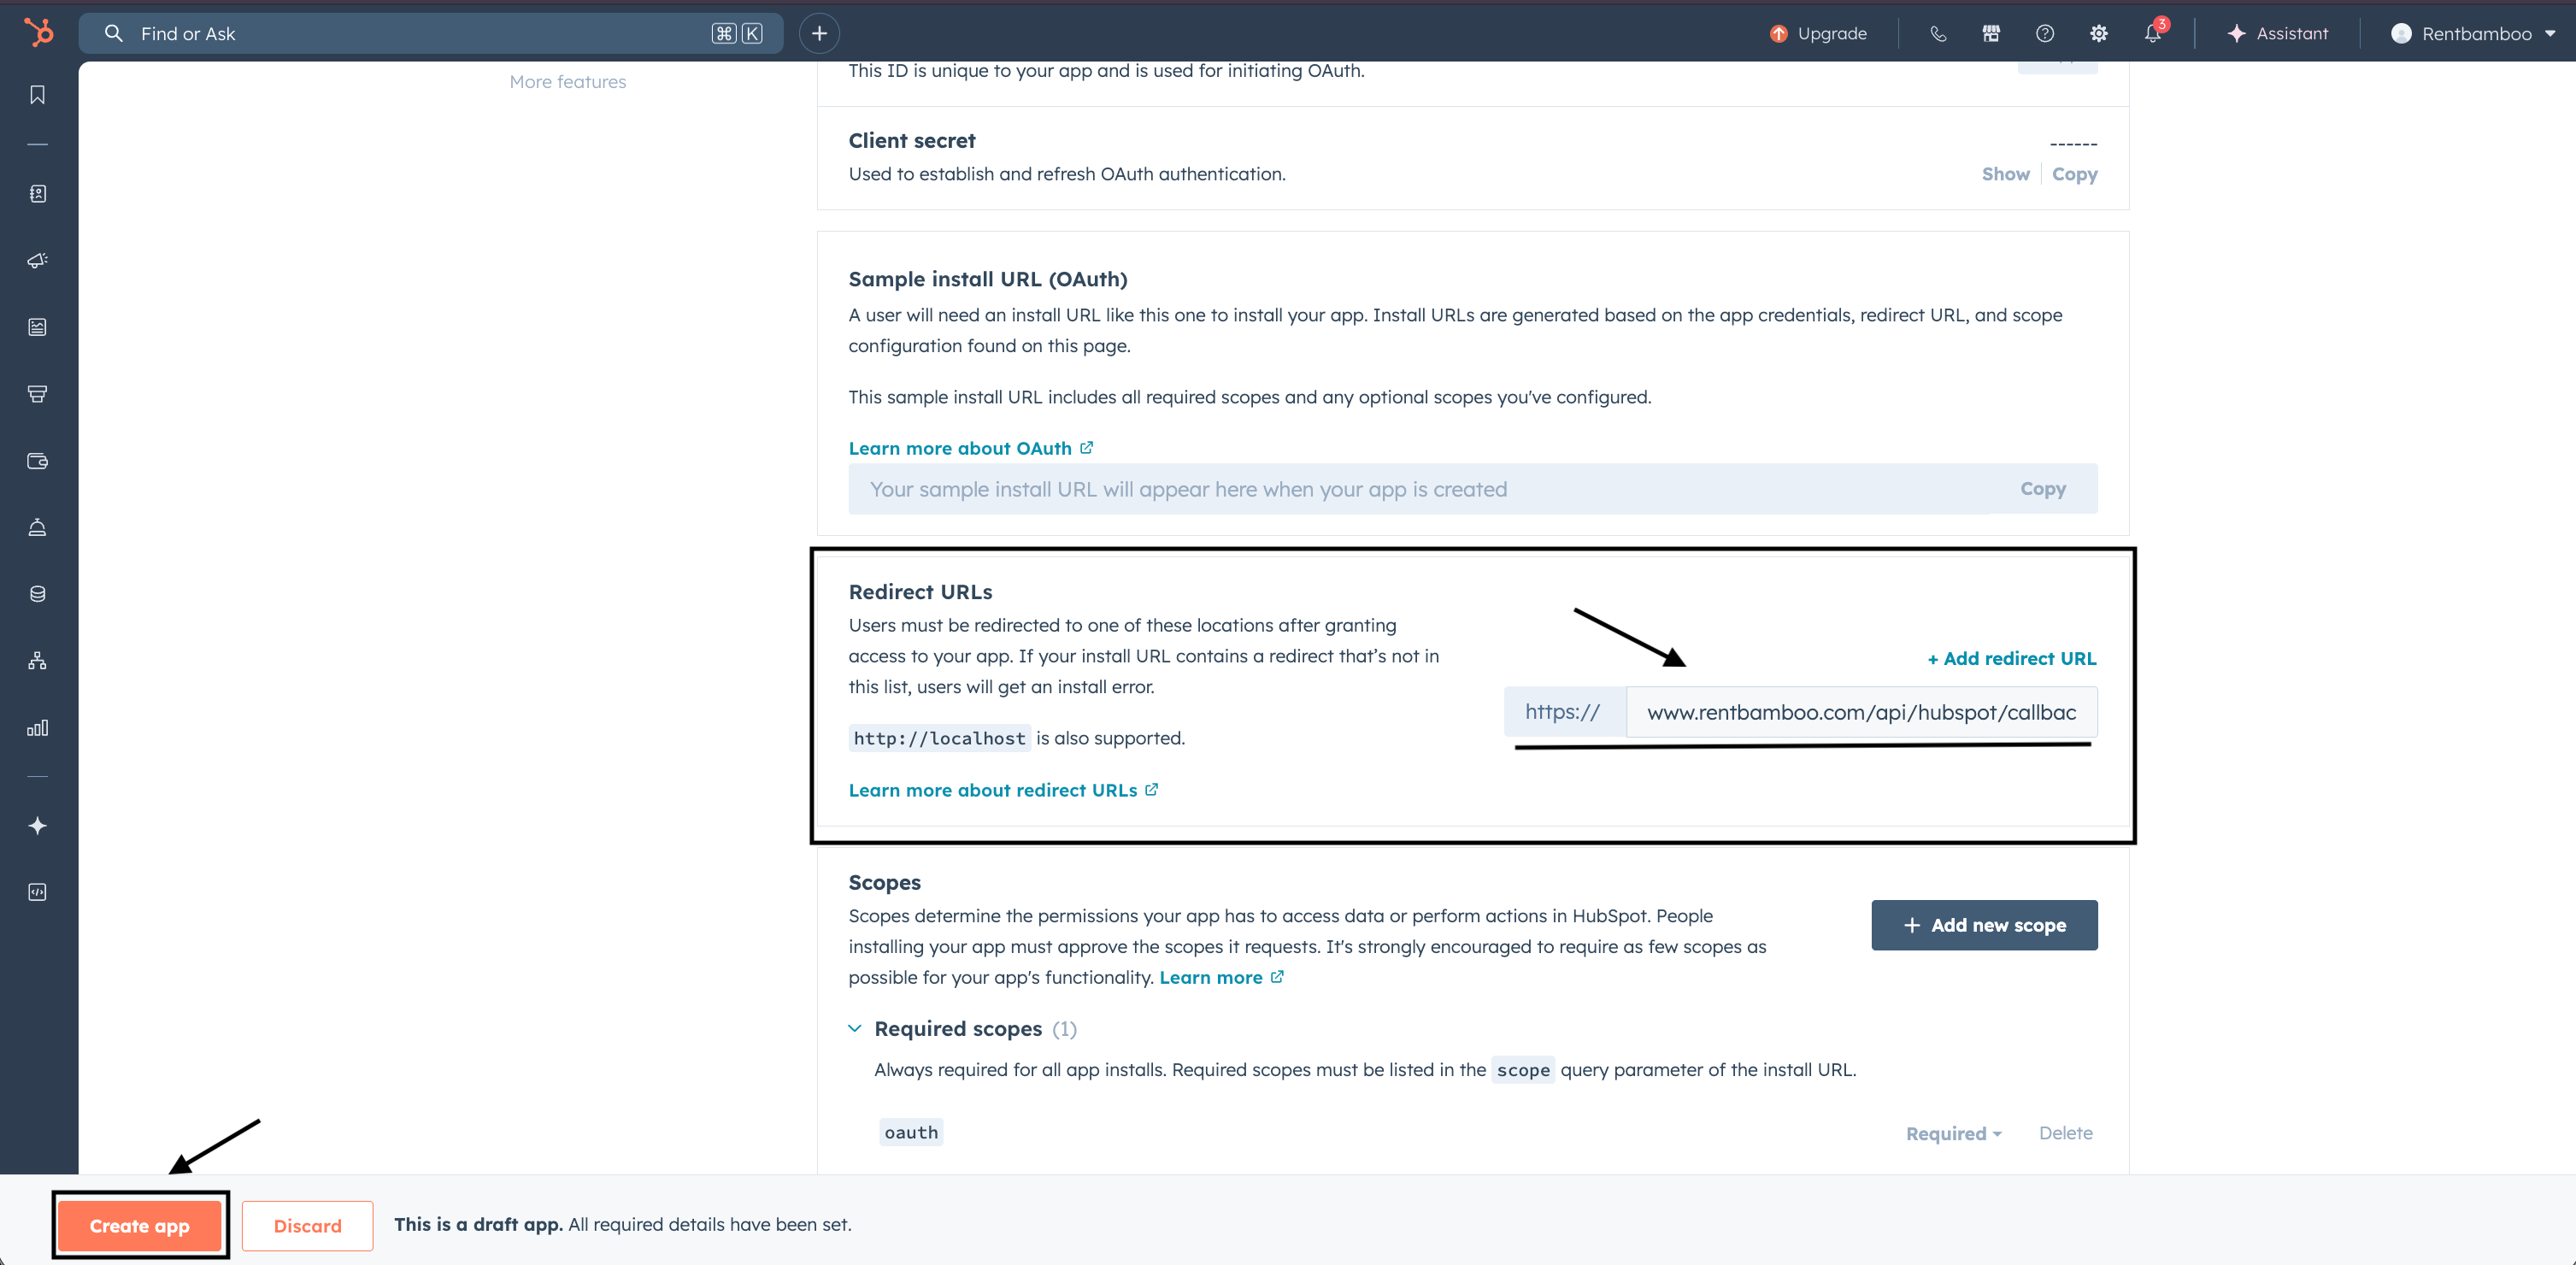
Once entered successfully, click on the Create app button.
Your app needs specific OAuth scopes to do its job. In your app settings:
Navigate to Auth tab → OAuth scopes and click on Add a scope button
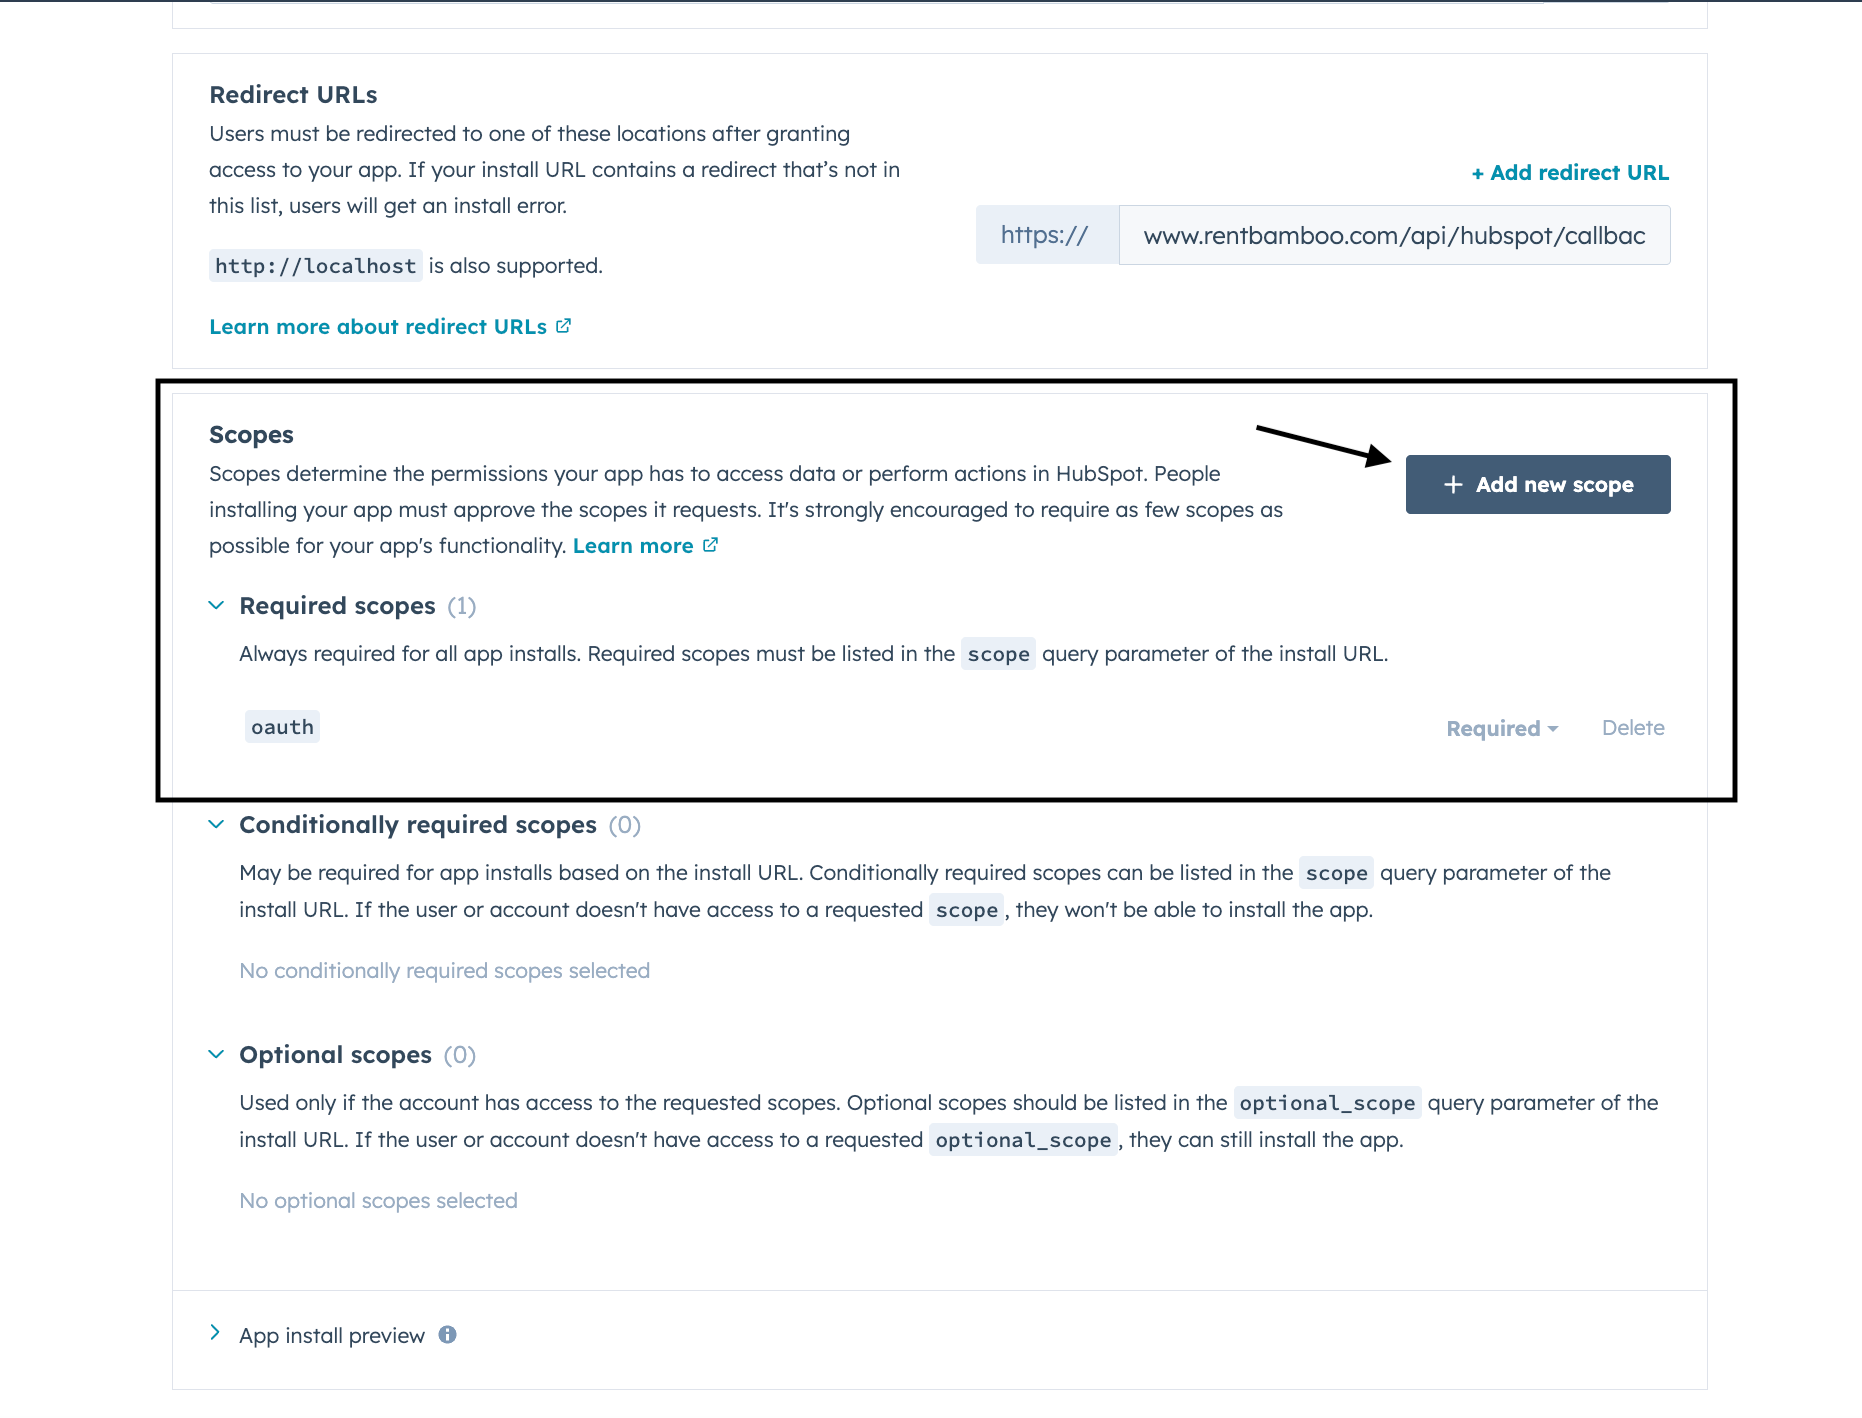
Add these scopes (Search and add them one by one, Oauth scope is added by default):
oauth

crm.objects.contacts.read
crm.objects.contacts.write
crm.objects.owners.read
crm.lists.read
crm.lists.write
crm.schemas.contacts.write
sales-email-read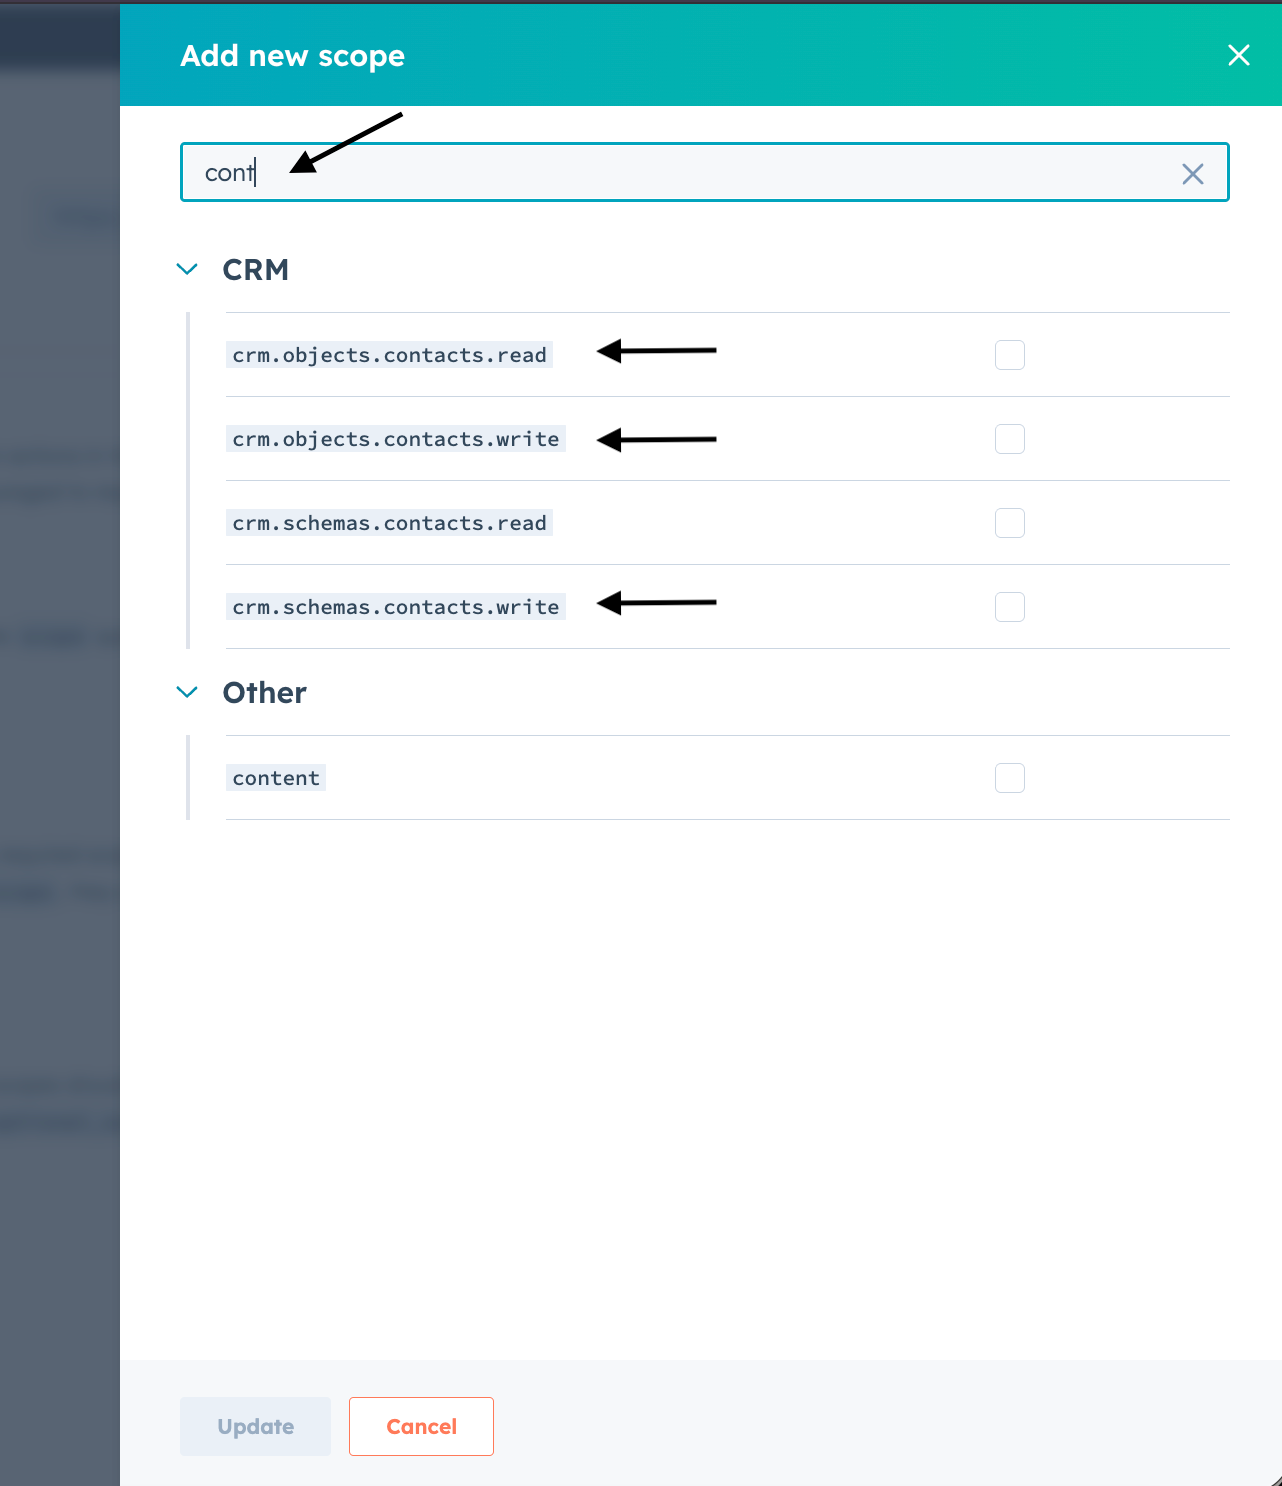
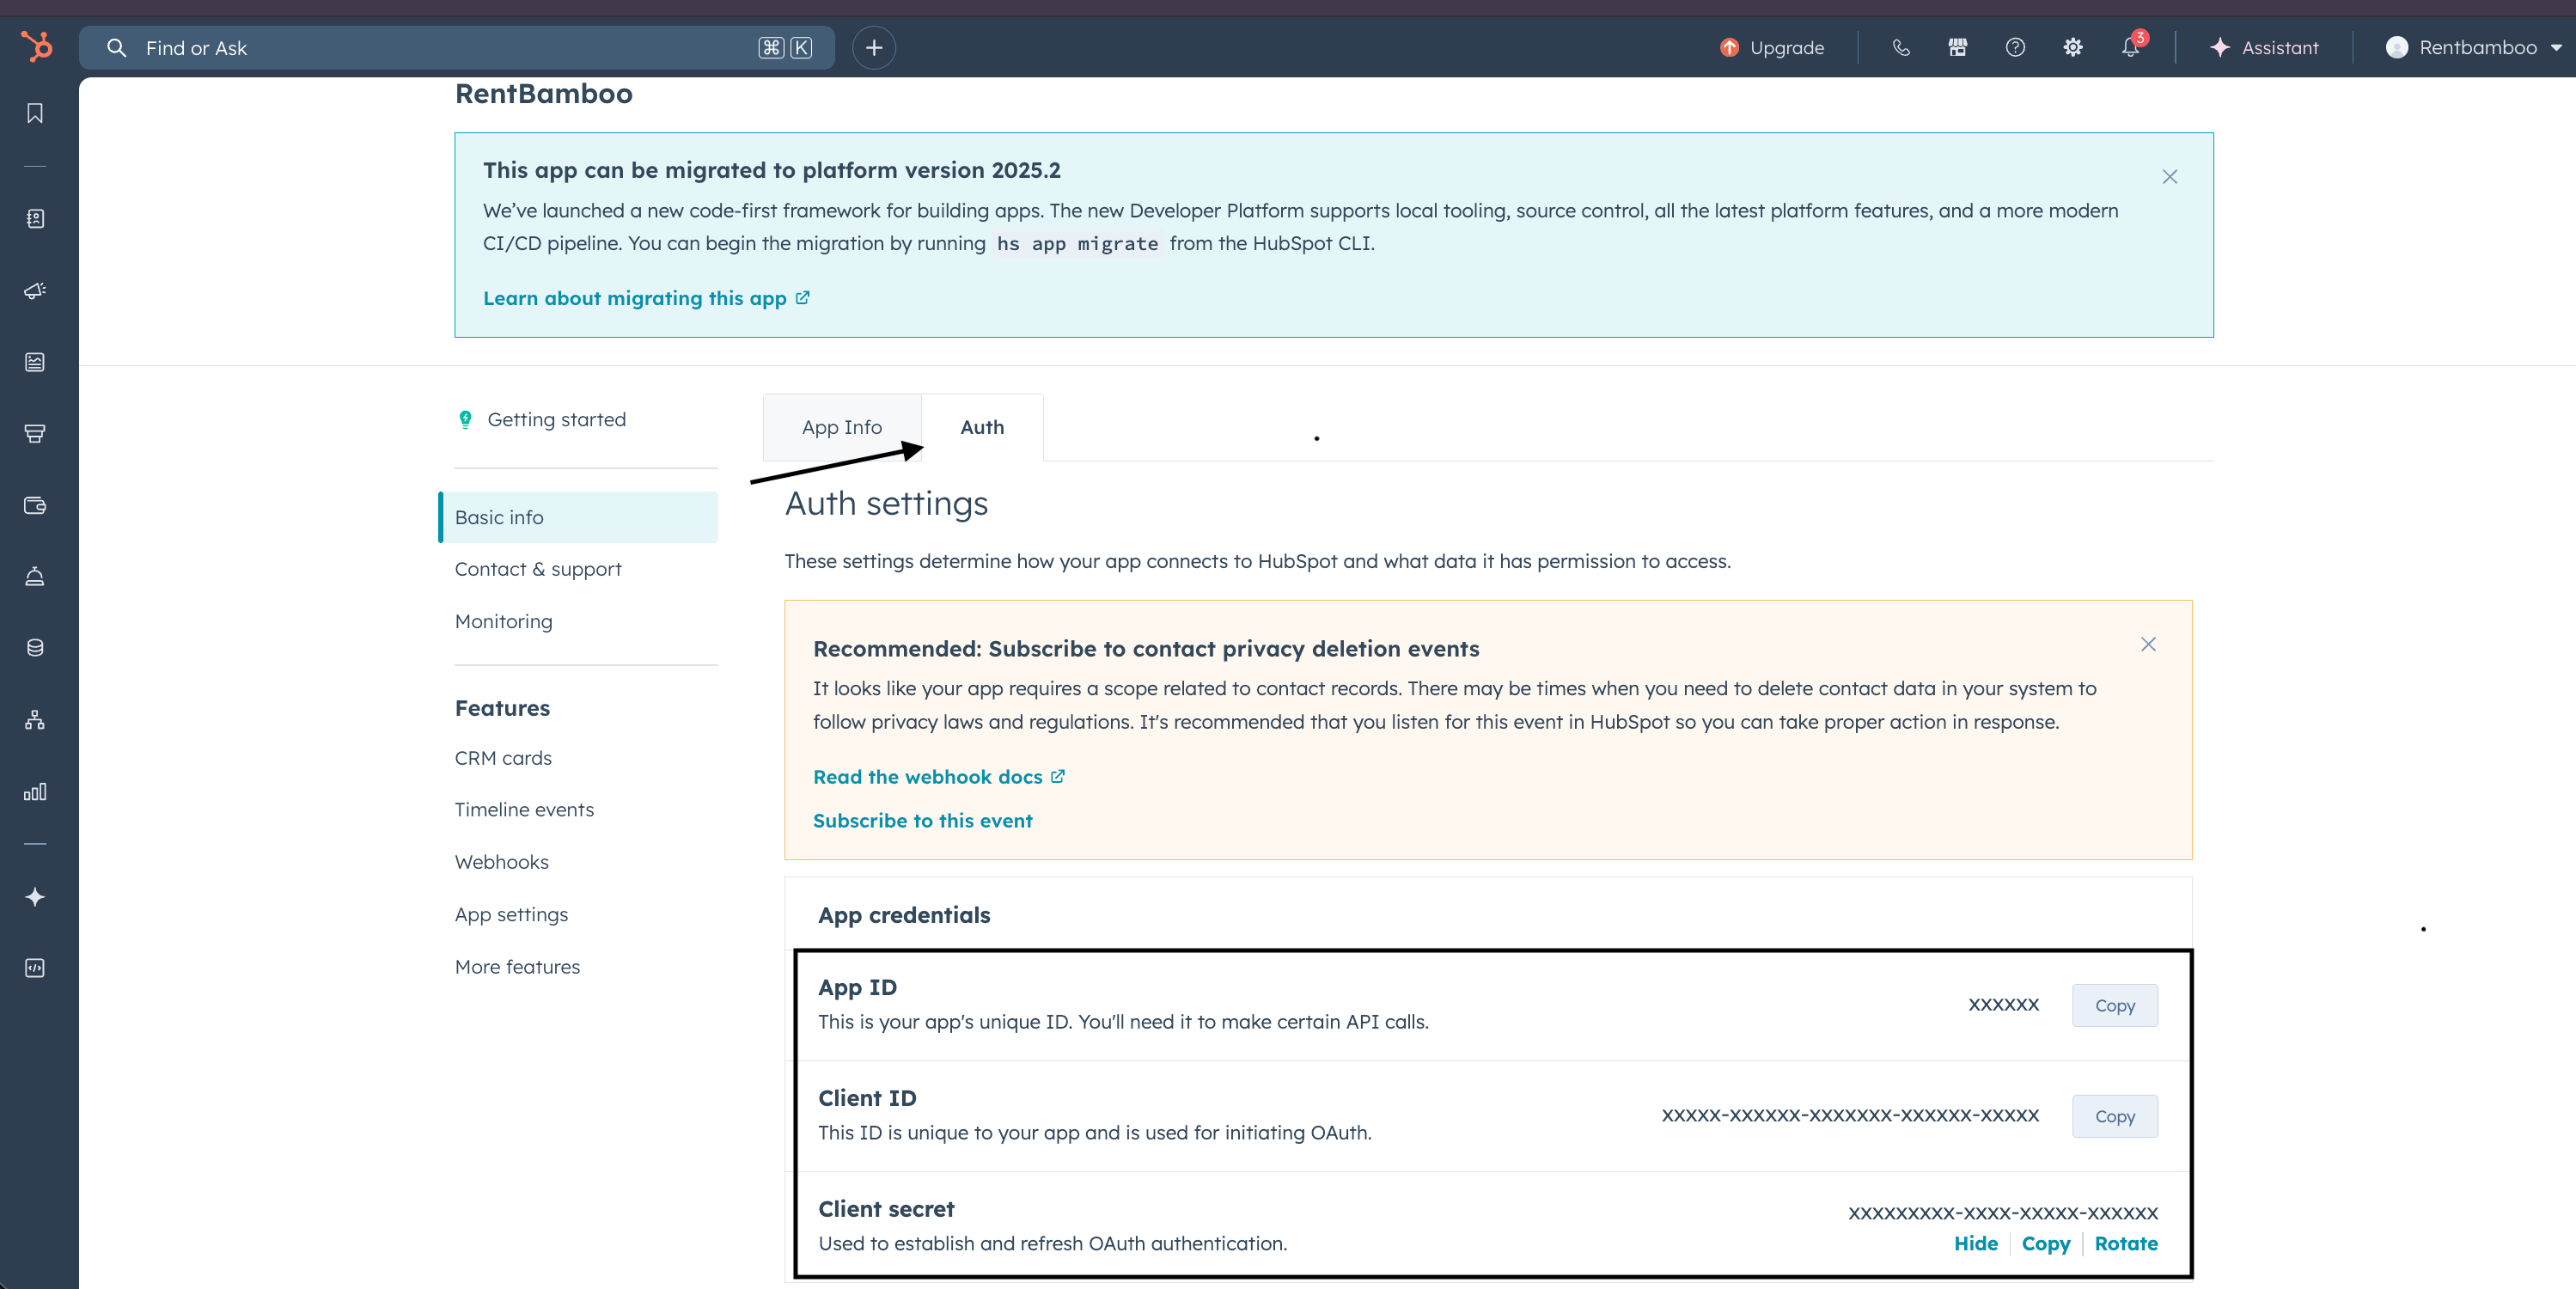
In your app settings, find and copy:
Client ID - public, paste into RentBamboo settings
Client Secret - private, paste into RentBamboo settings
App ID - numeric, paste into RentBamboo settings (this is different from Client ID)
Click on the developer button and navigate to Keys -> Developer API Key
Click Show and this is your developerApiKey. Copy it.
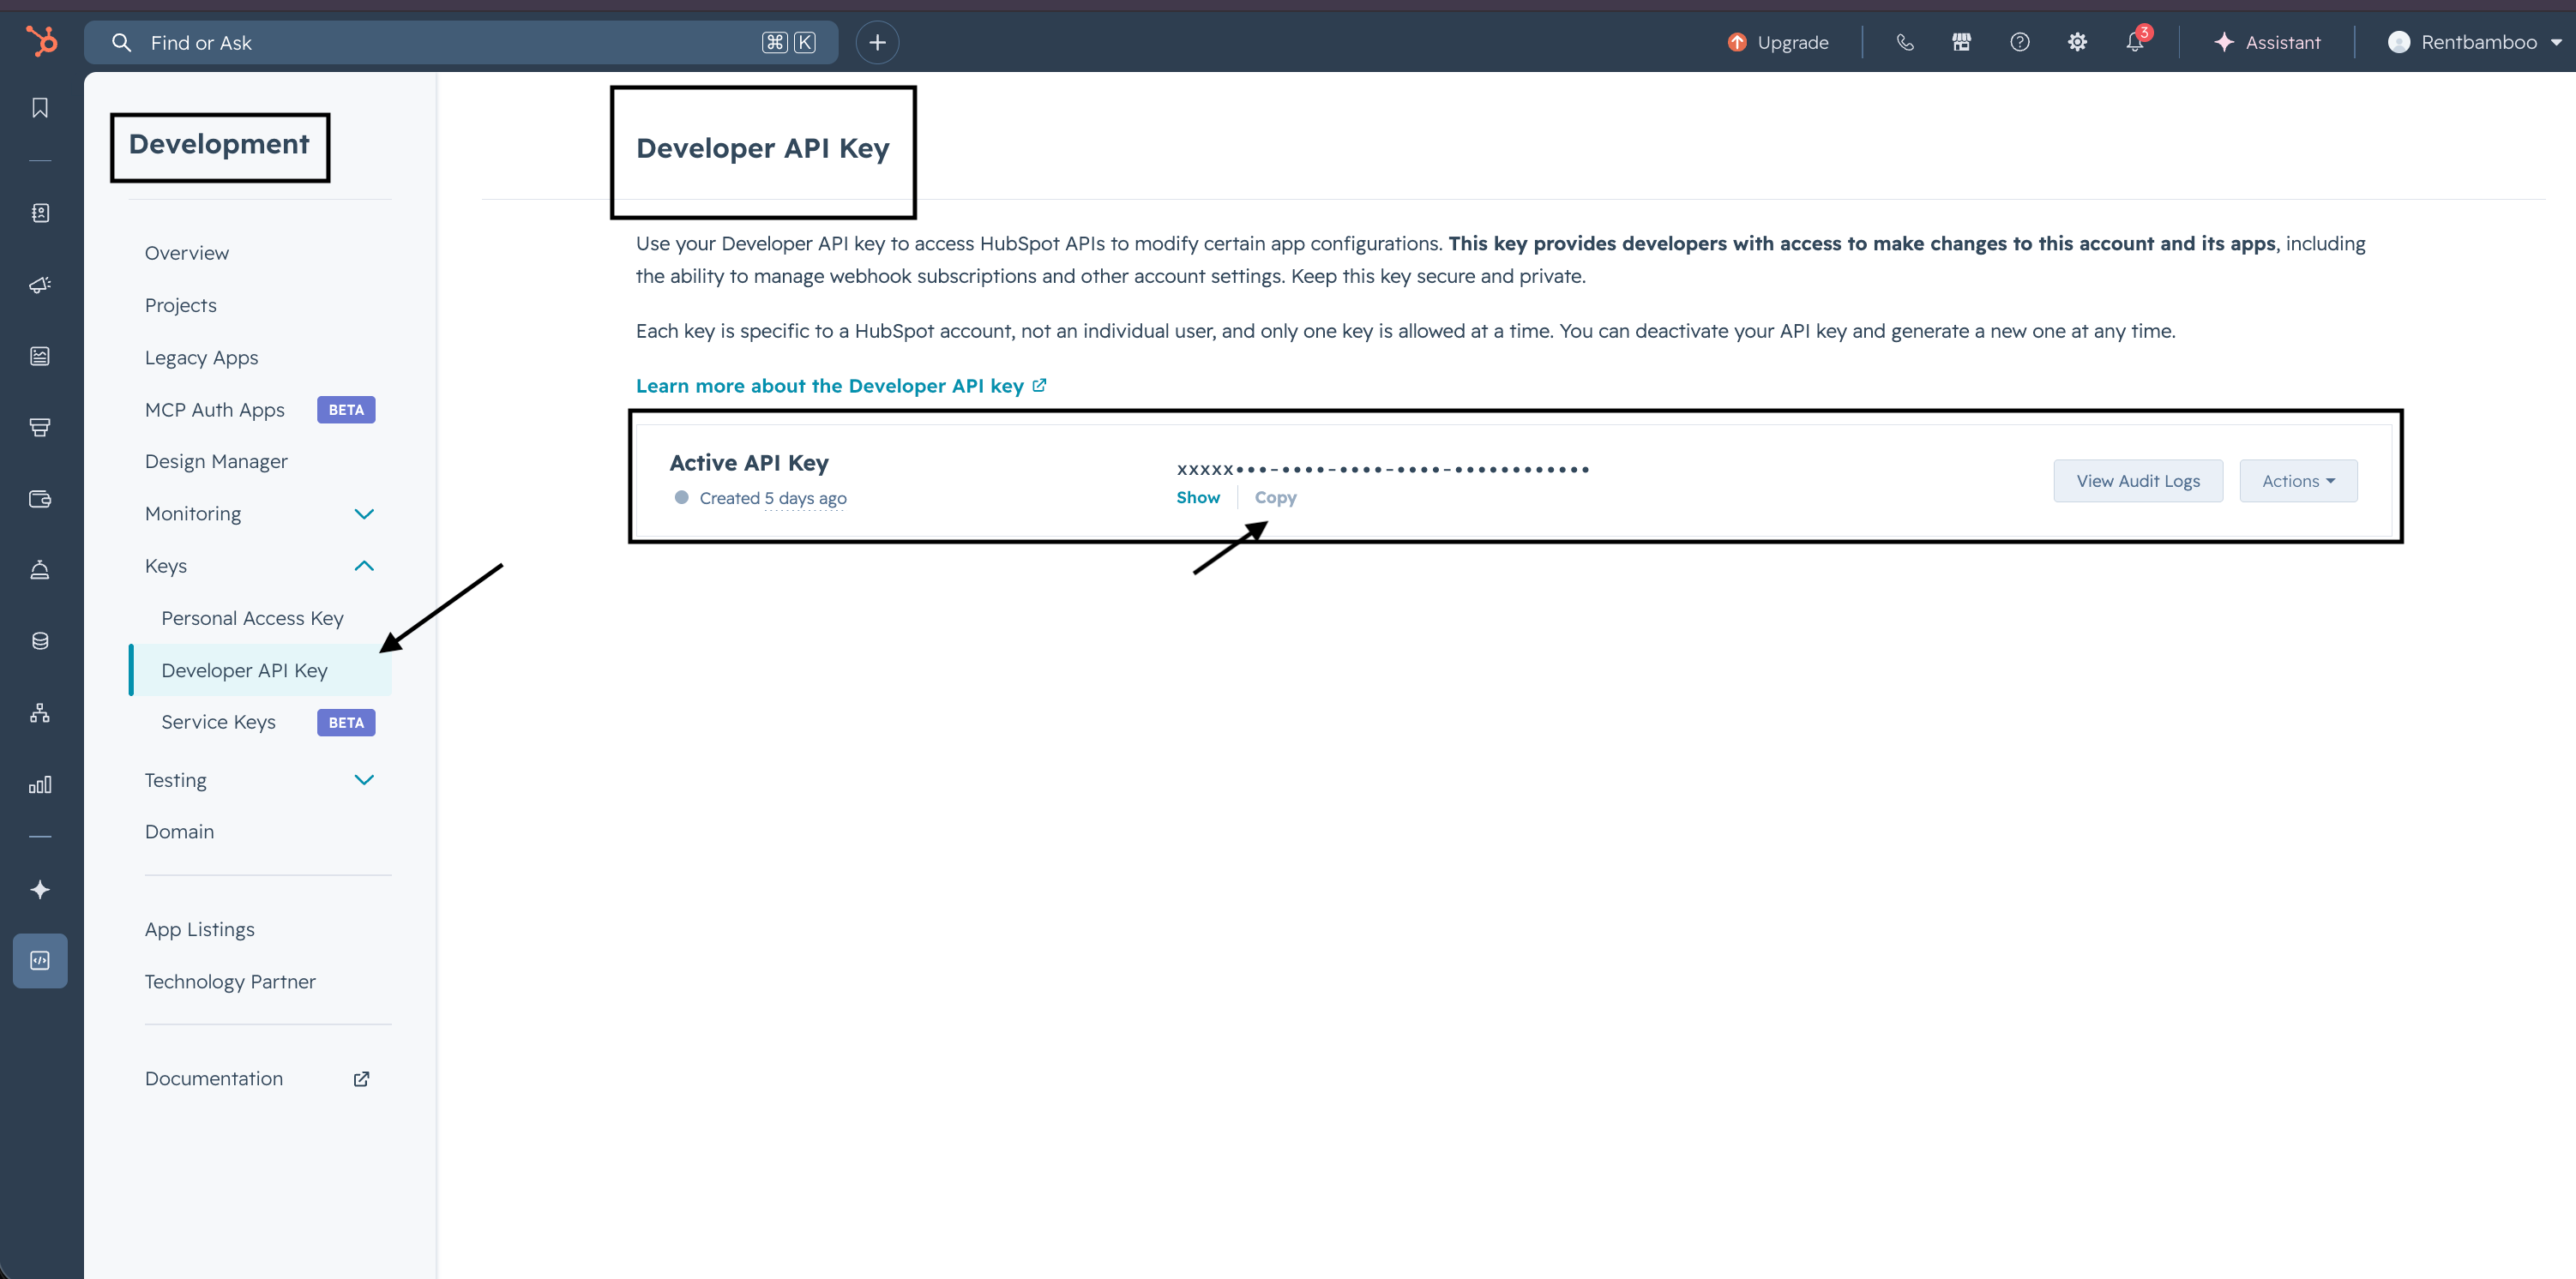
⚠ Developer API keys are tied to your Developer Portal account, not your CRM portal. You need the hapikey from the developer account that owns the app, not from the CRM portal you're connecting to.
You must be a team Admin or Owner in RentBamboo
You must have your four HubSpot credentials ready
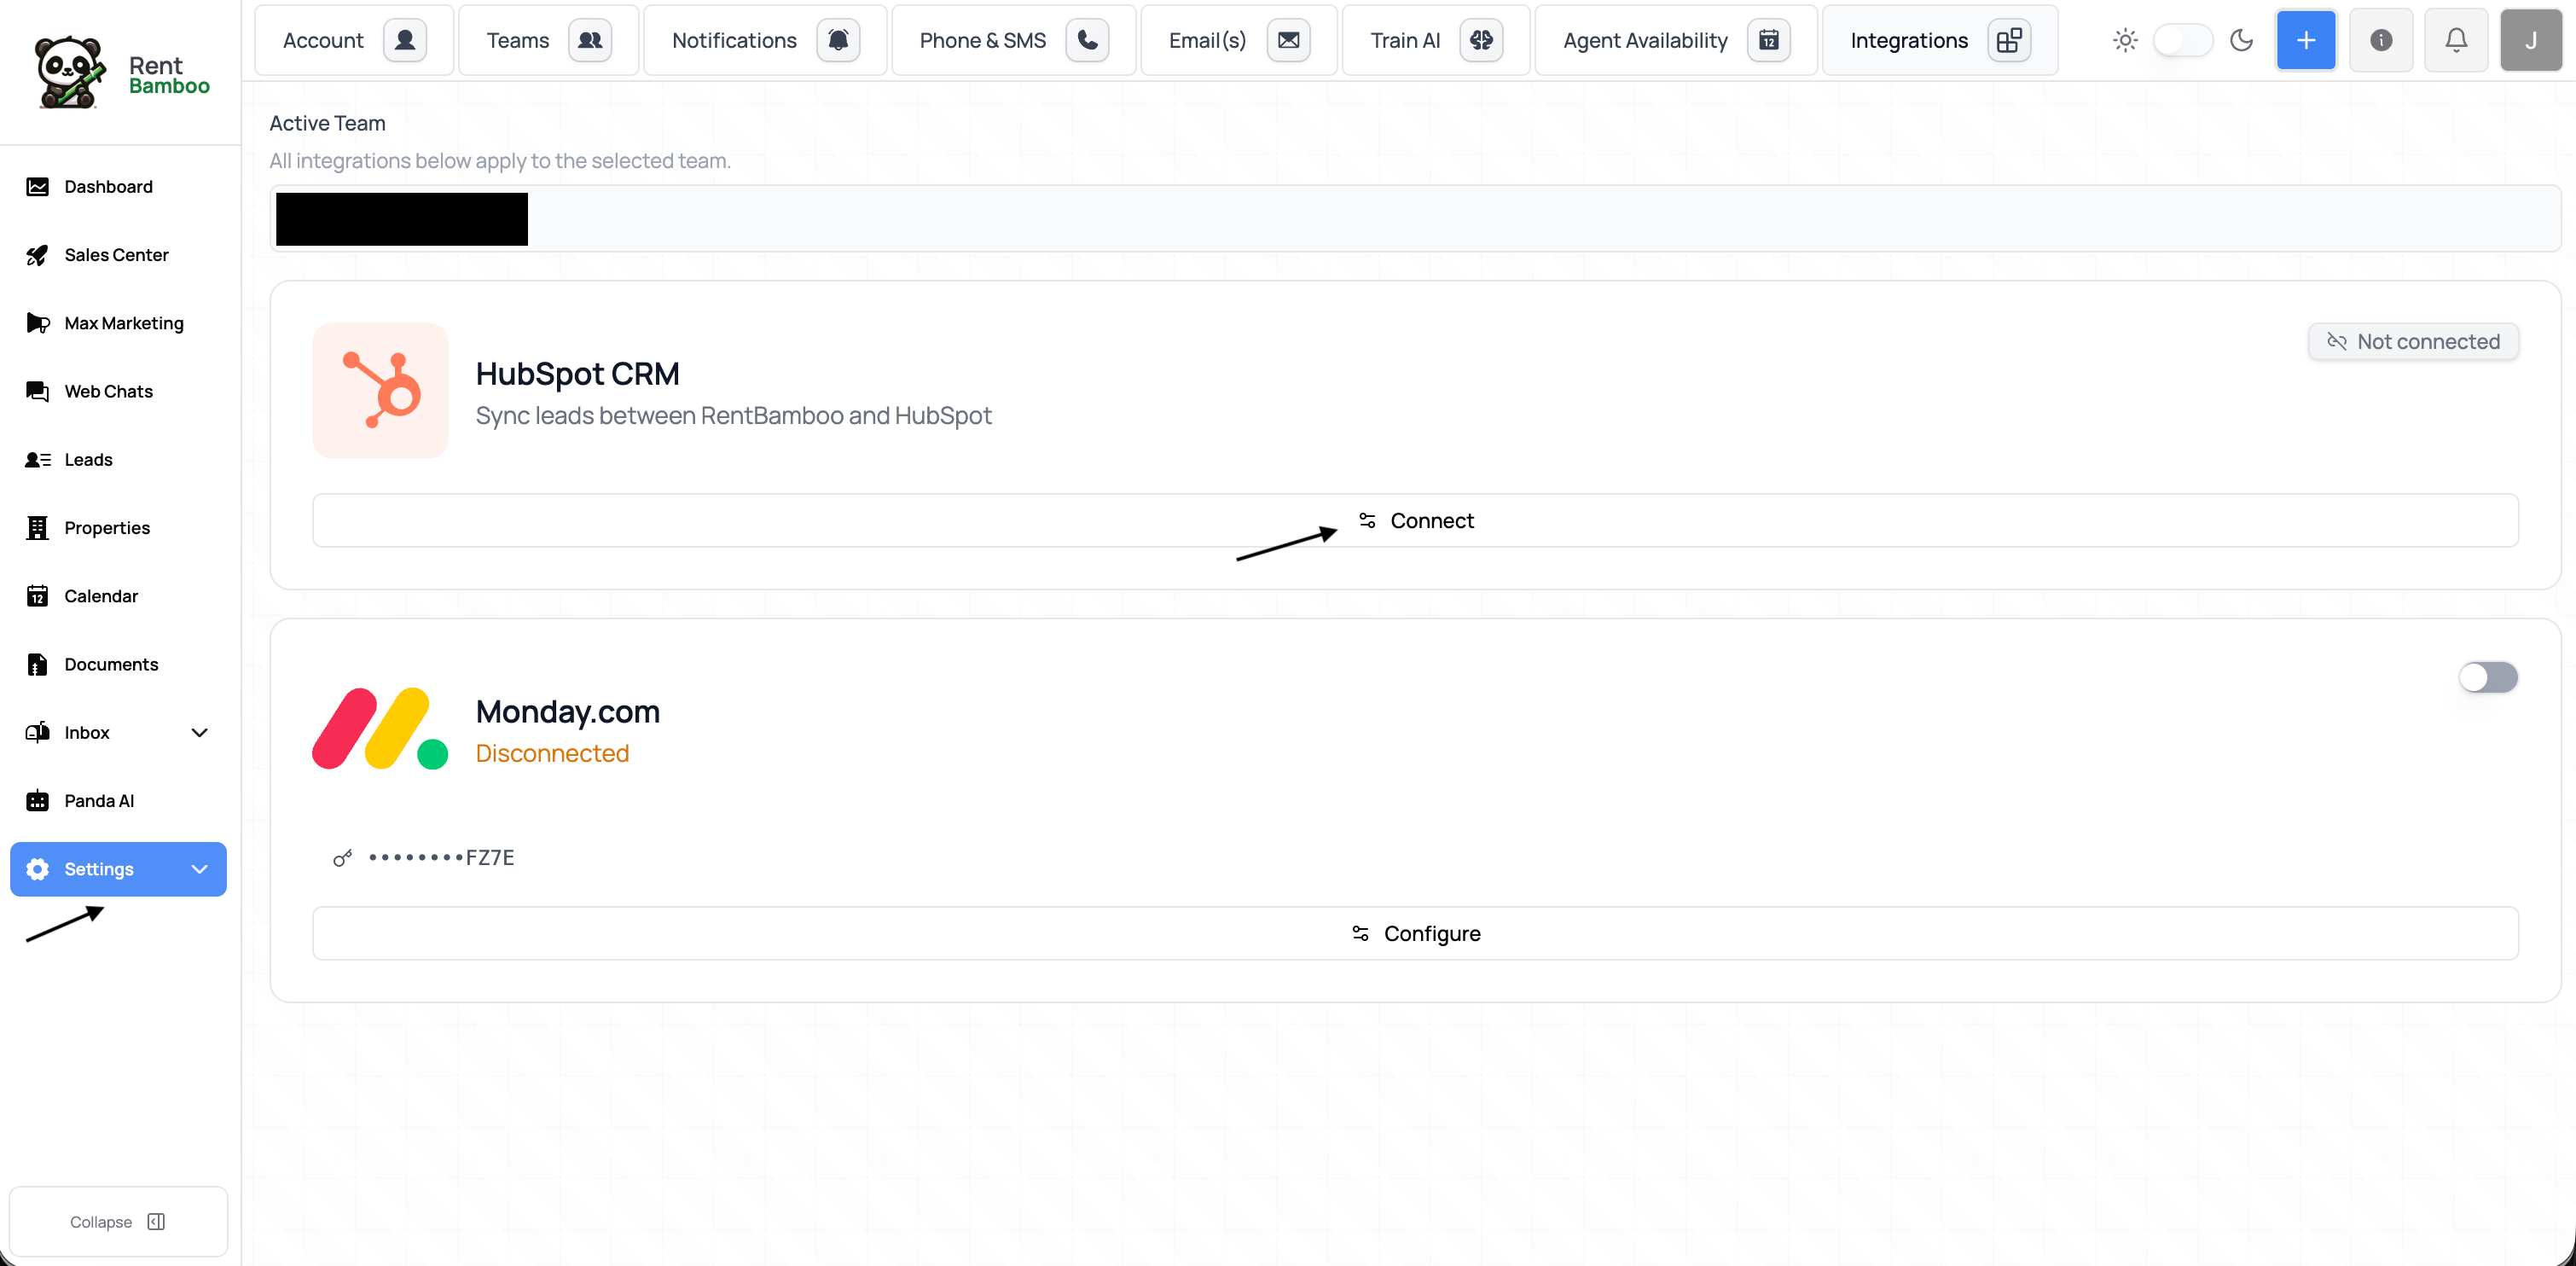
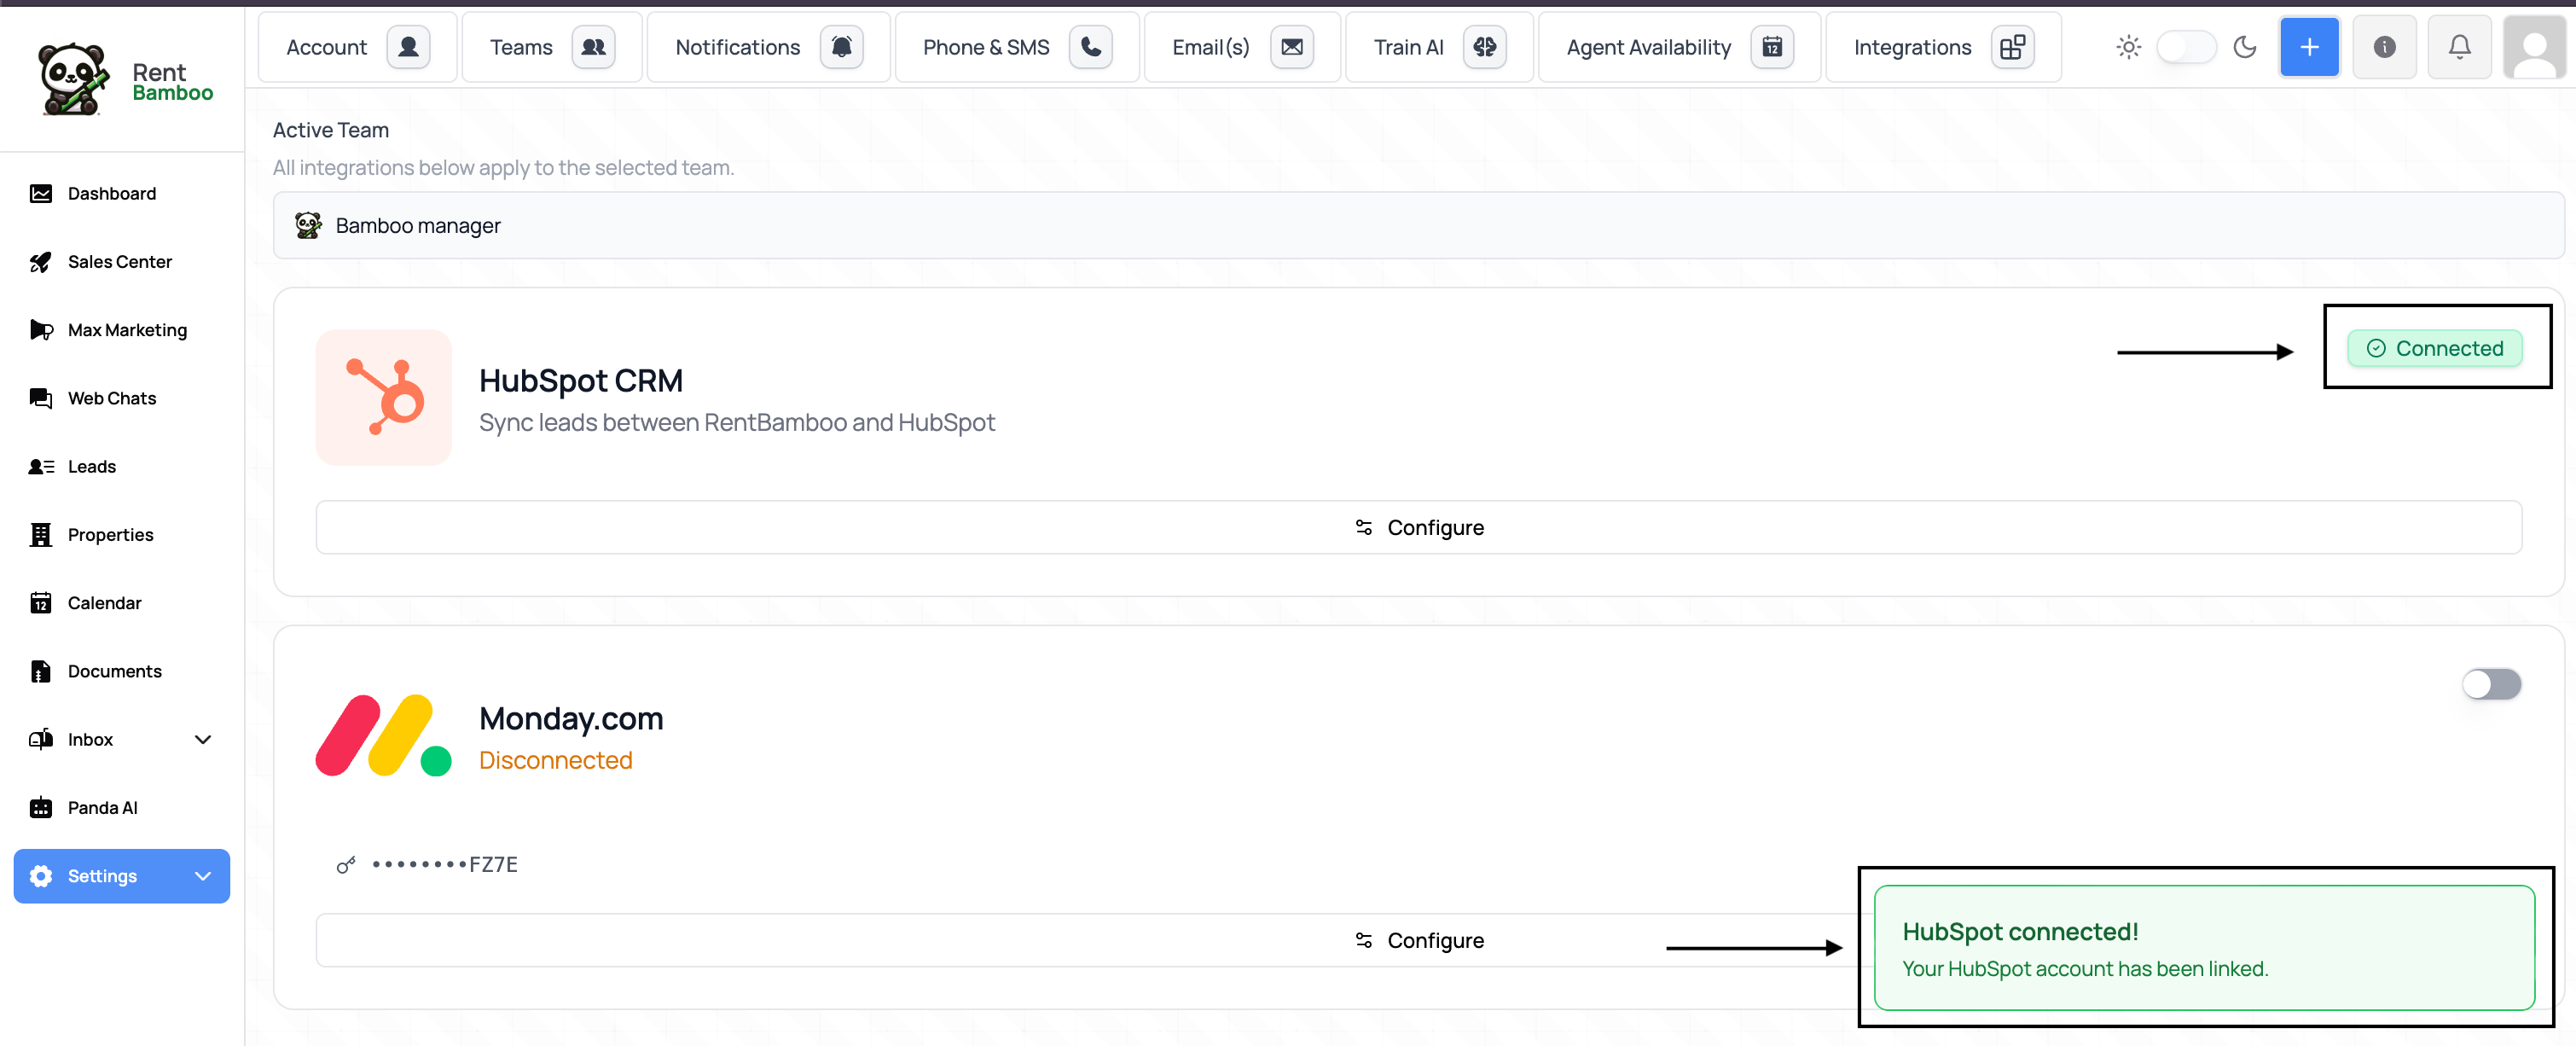
Go to Dashboard → Settings → Integrations
Click on the Connect button on the HubSpot Integration screen.
In the Credentials section, enter:
Client ID - from your HubSpot app
Client Secret - from your HubSpot app
App ID - numeric, from your HubSpot app
Developer API Key - from your HubSpot developer portal
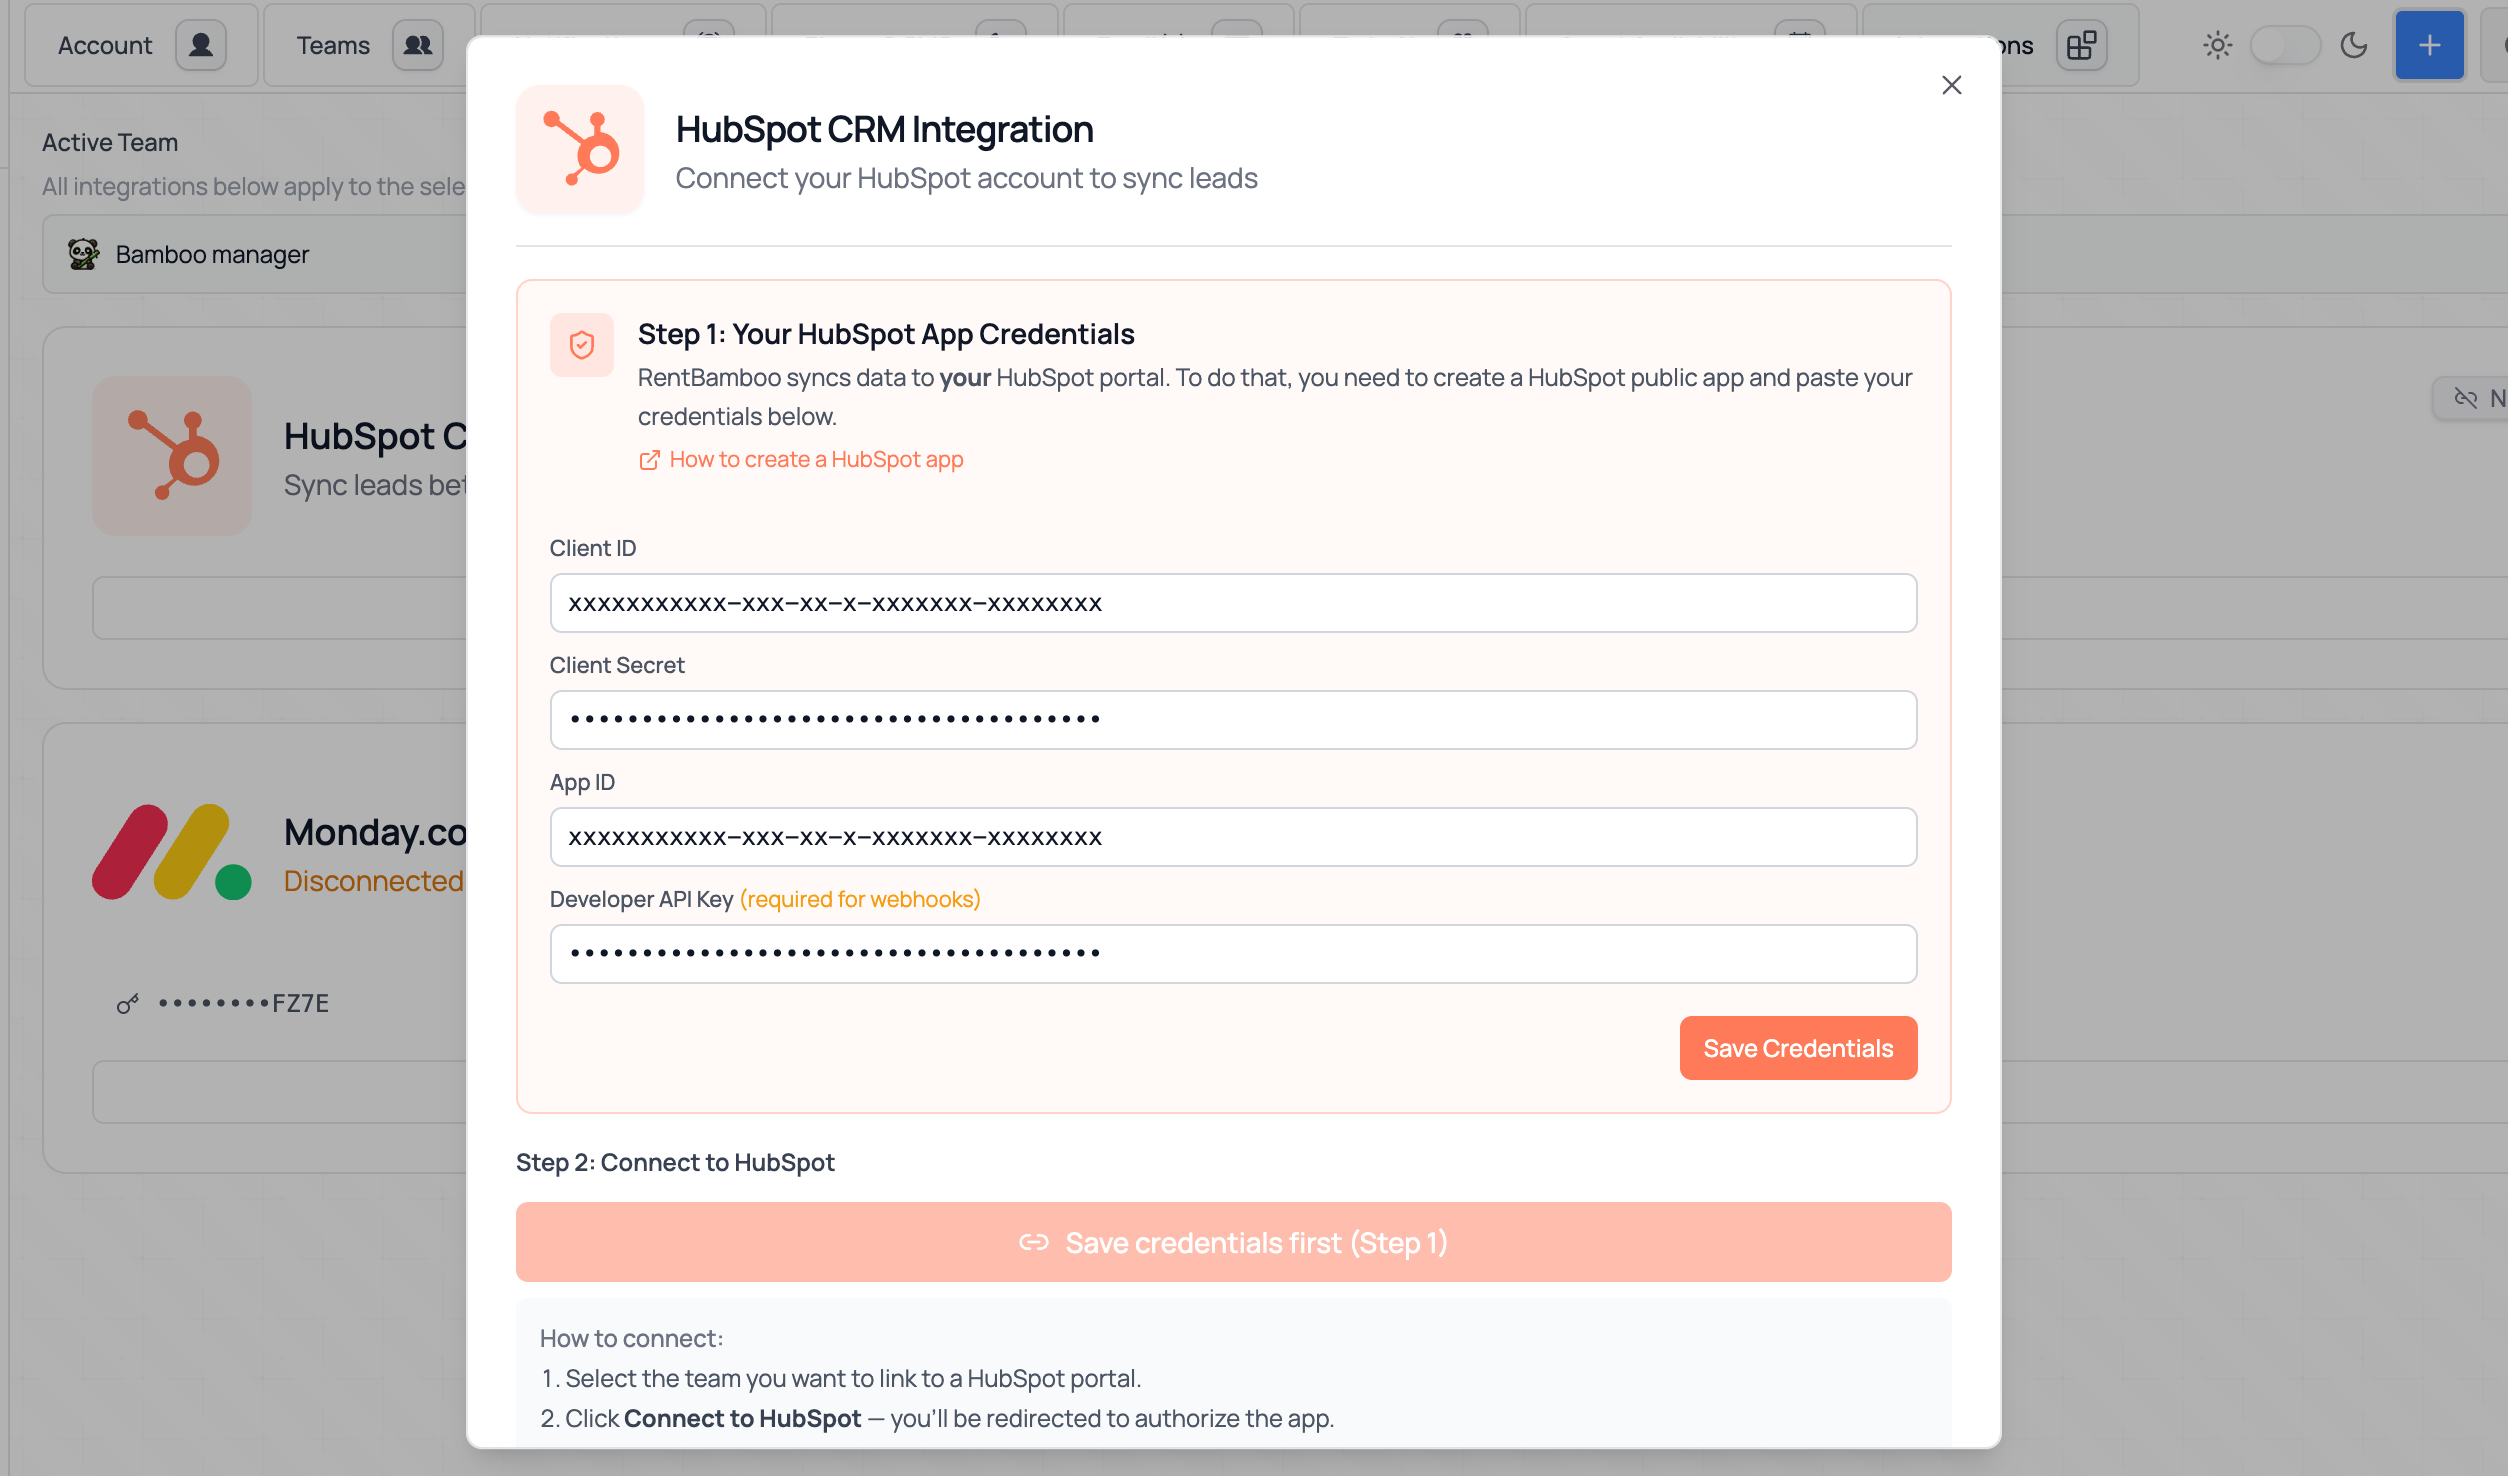
Click on the Save Credentials button.
Click Connect to HubSpot
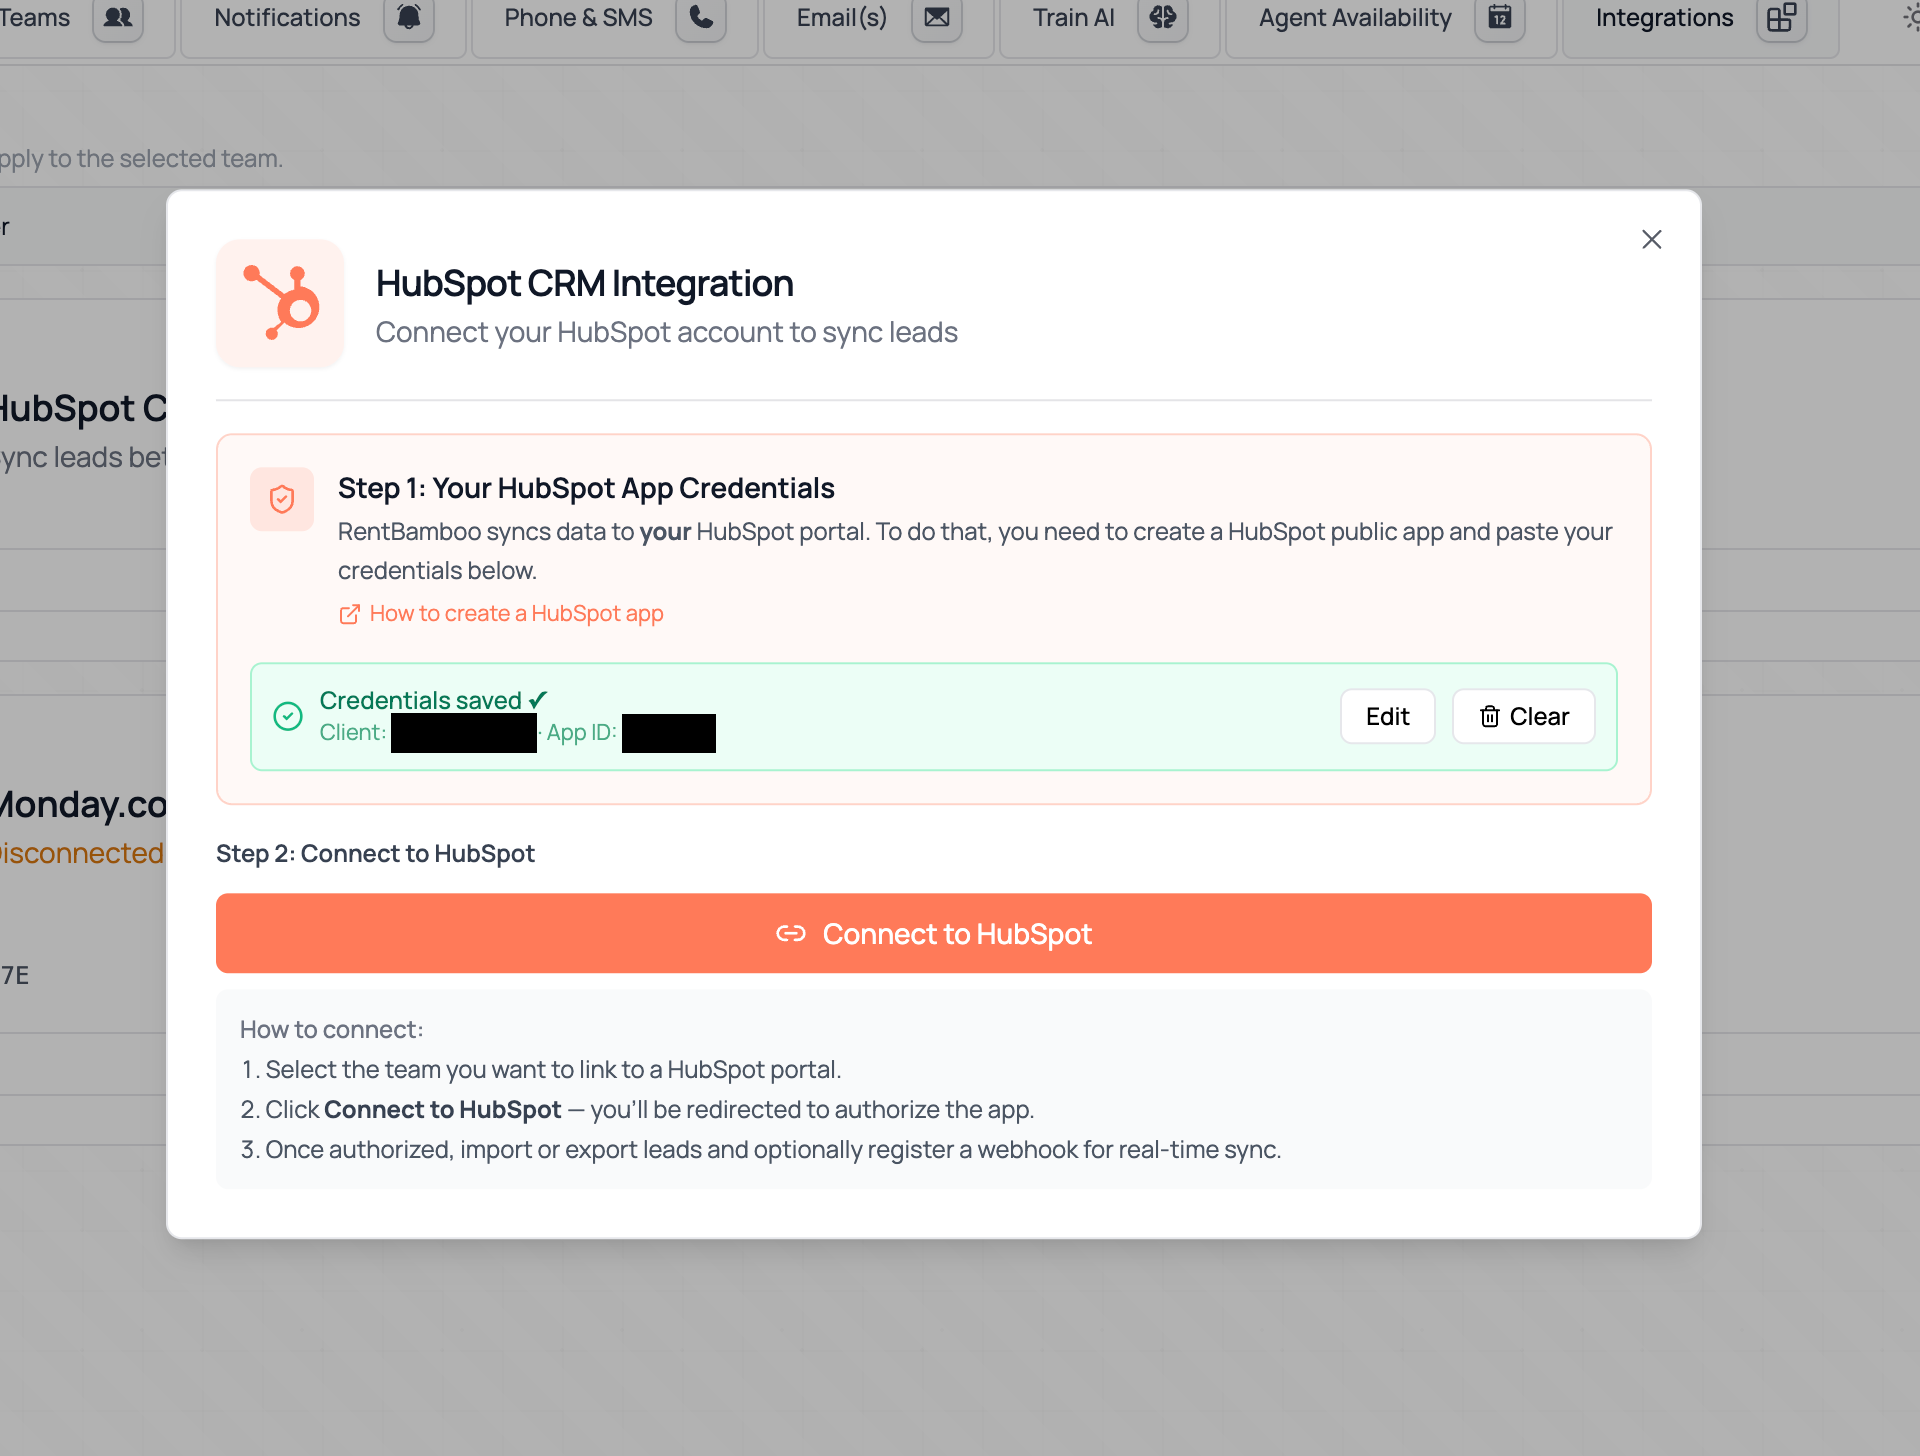
You'll be redirected to HubSpot to authorize the app
Click Connect App in the HubSpot consent screen and type I accept the risk.
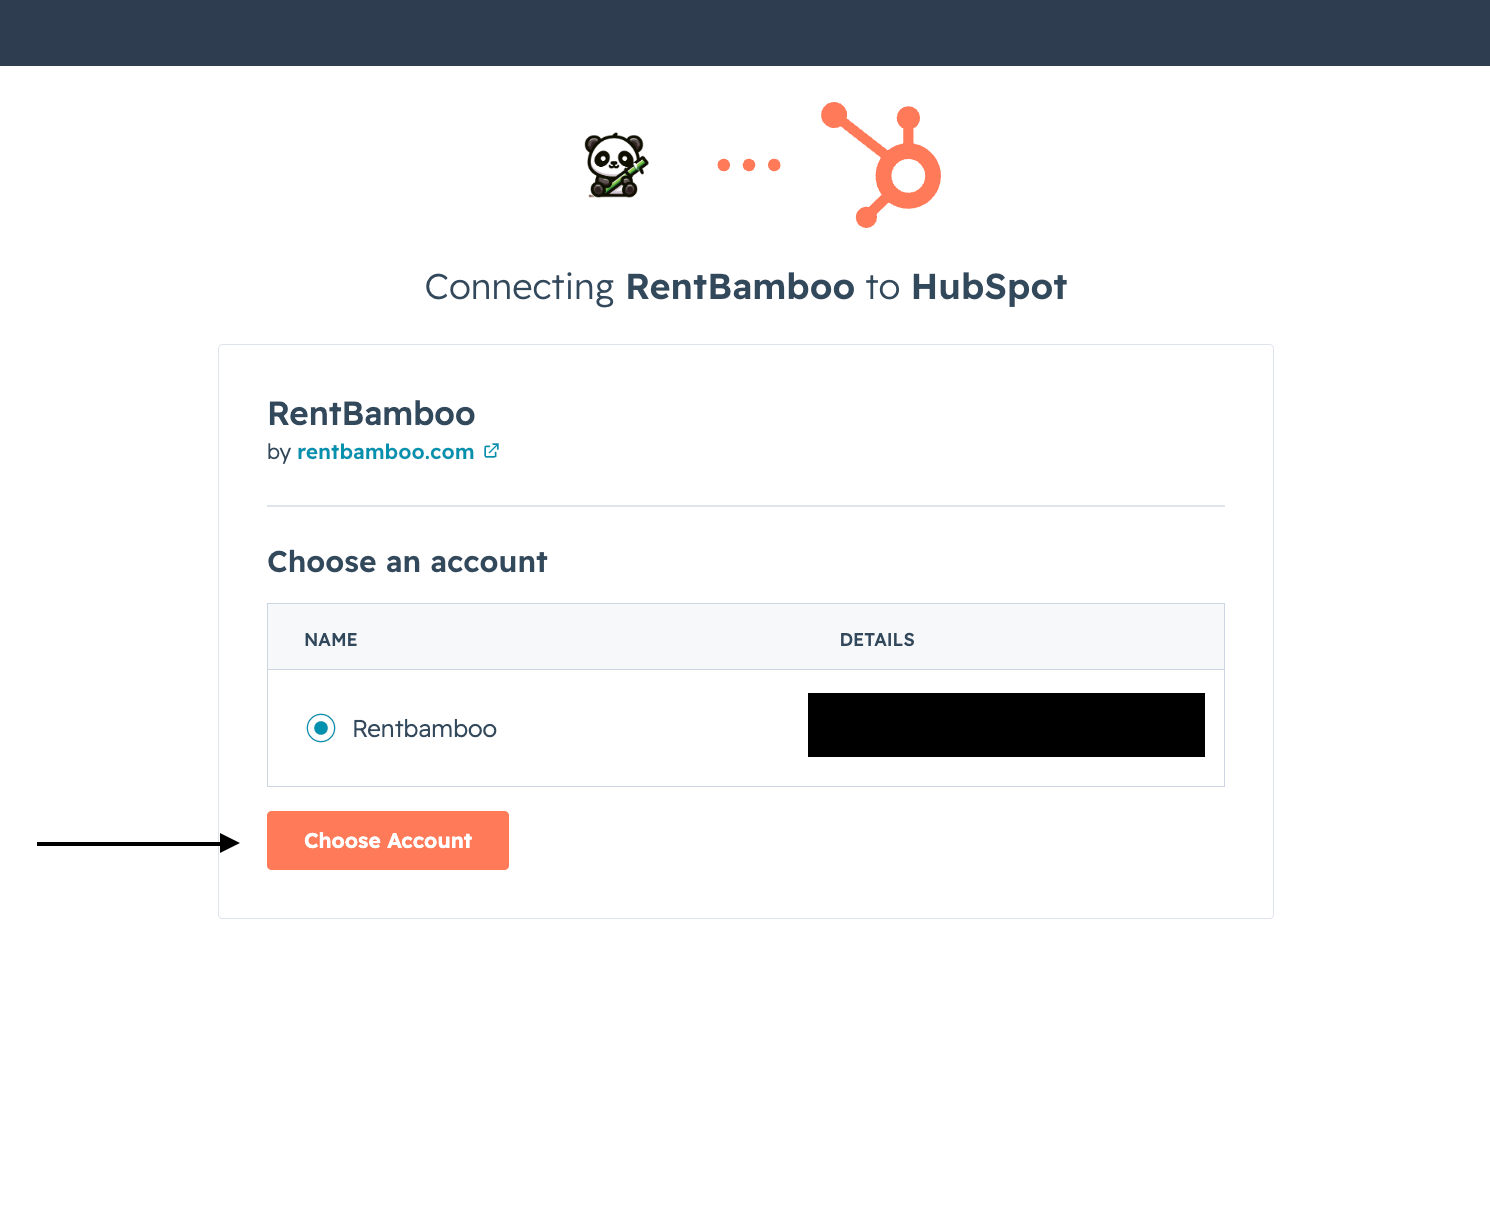
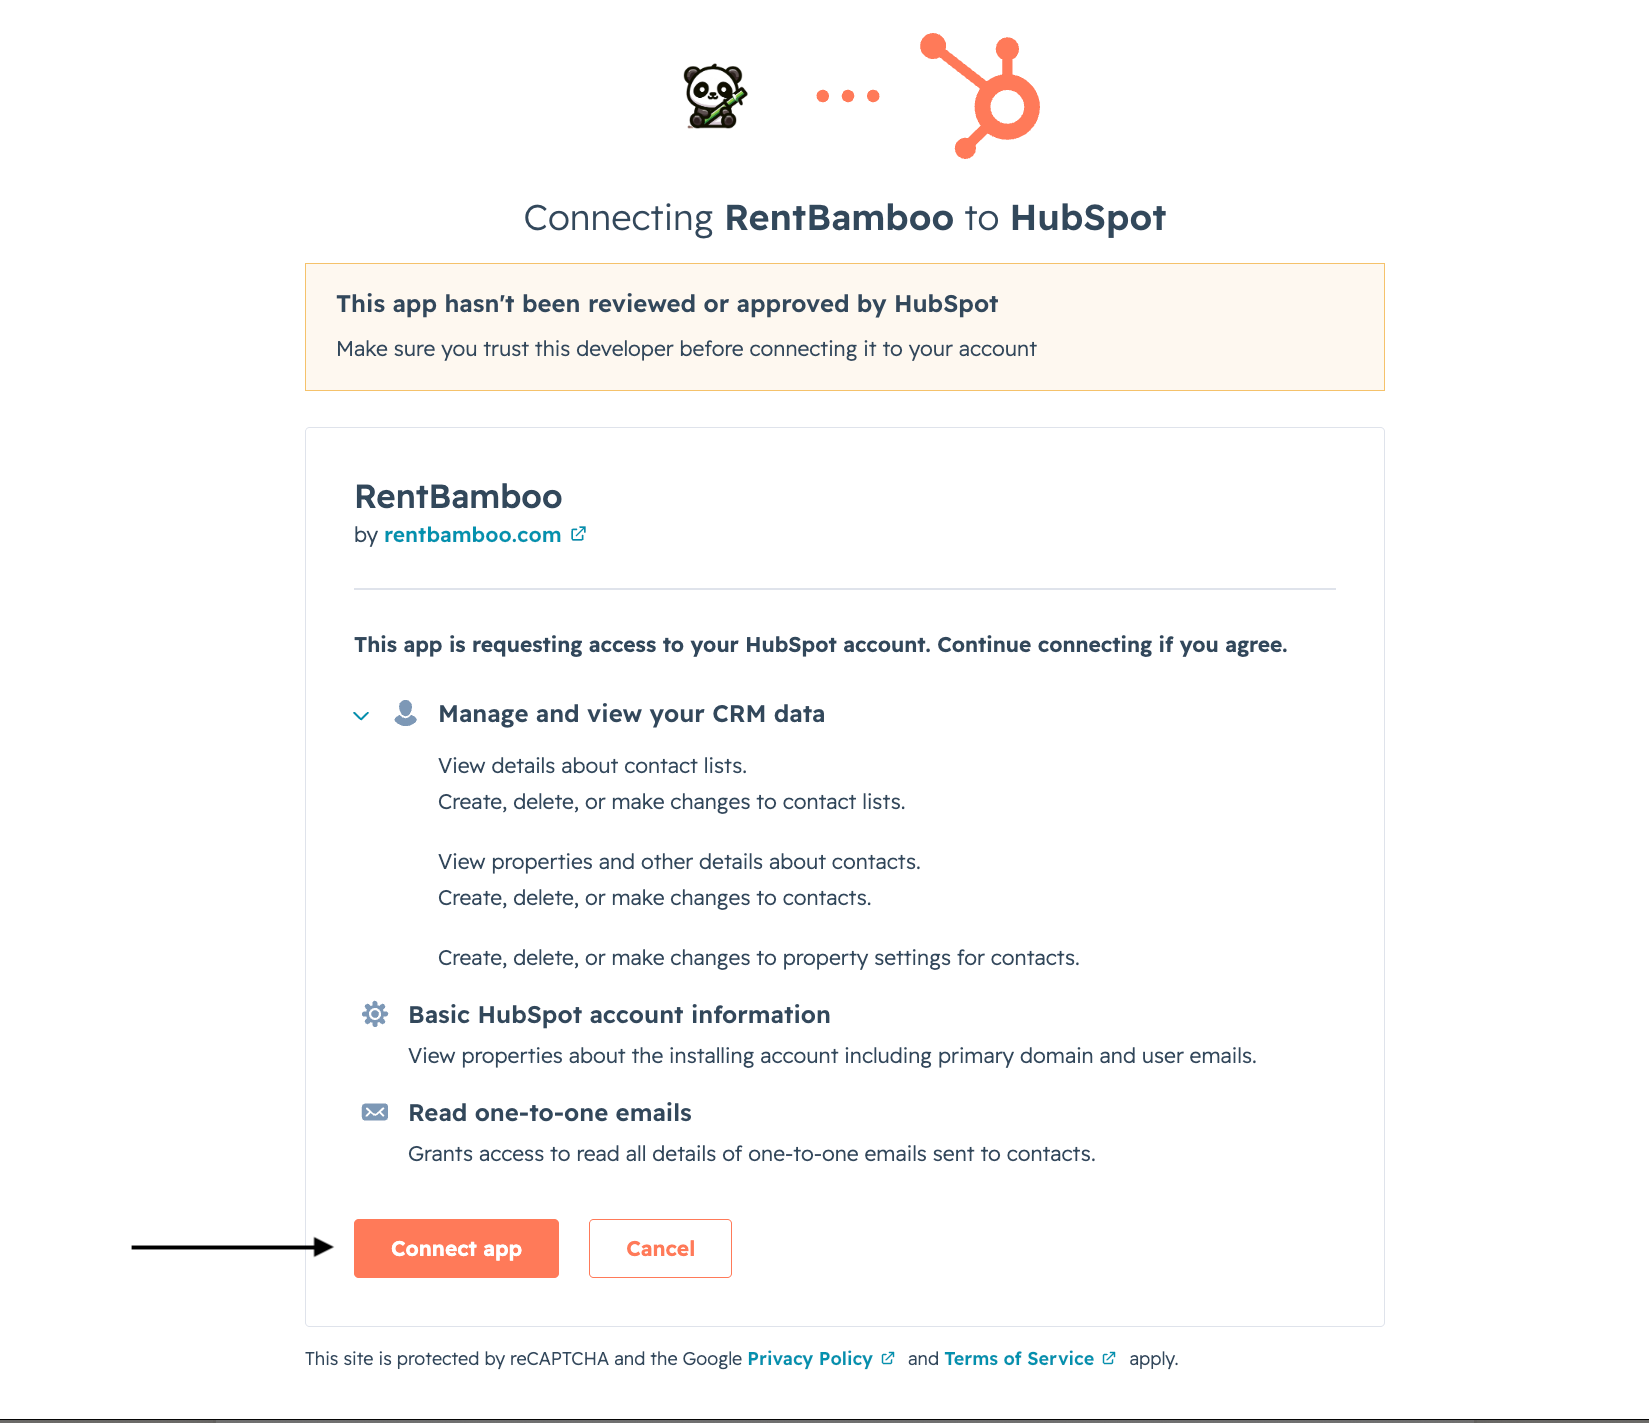
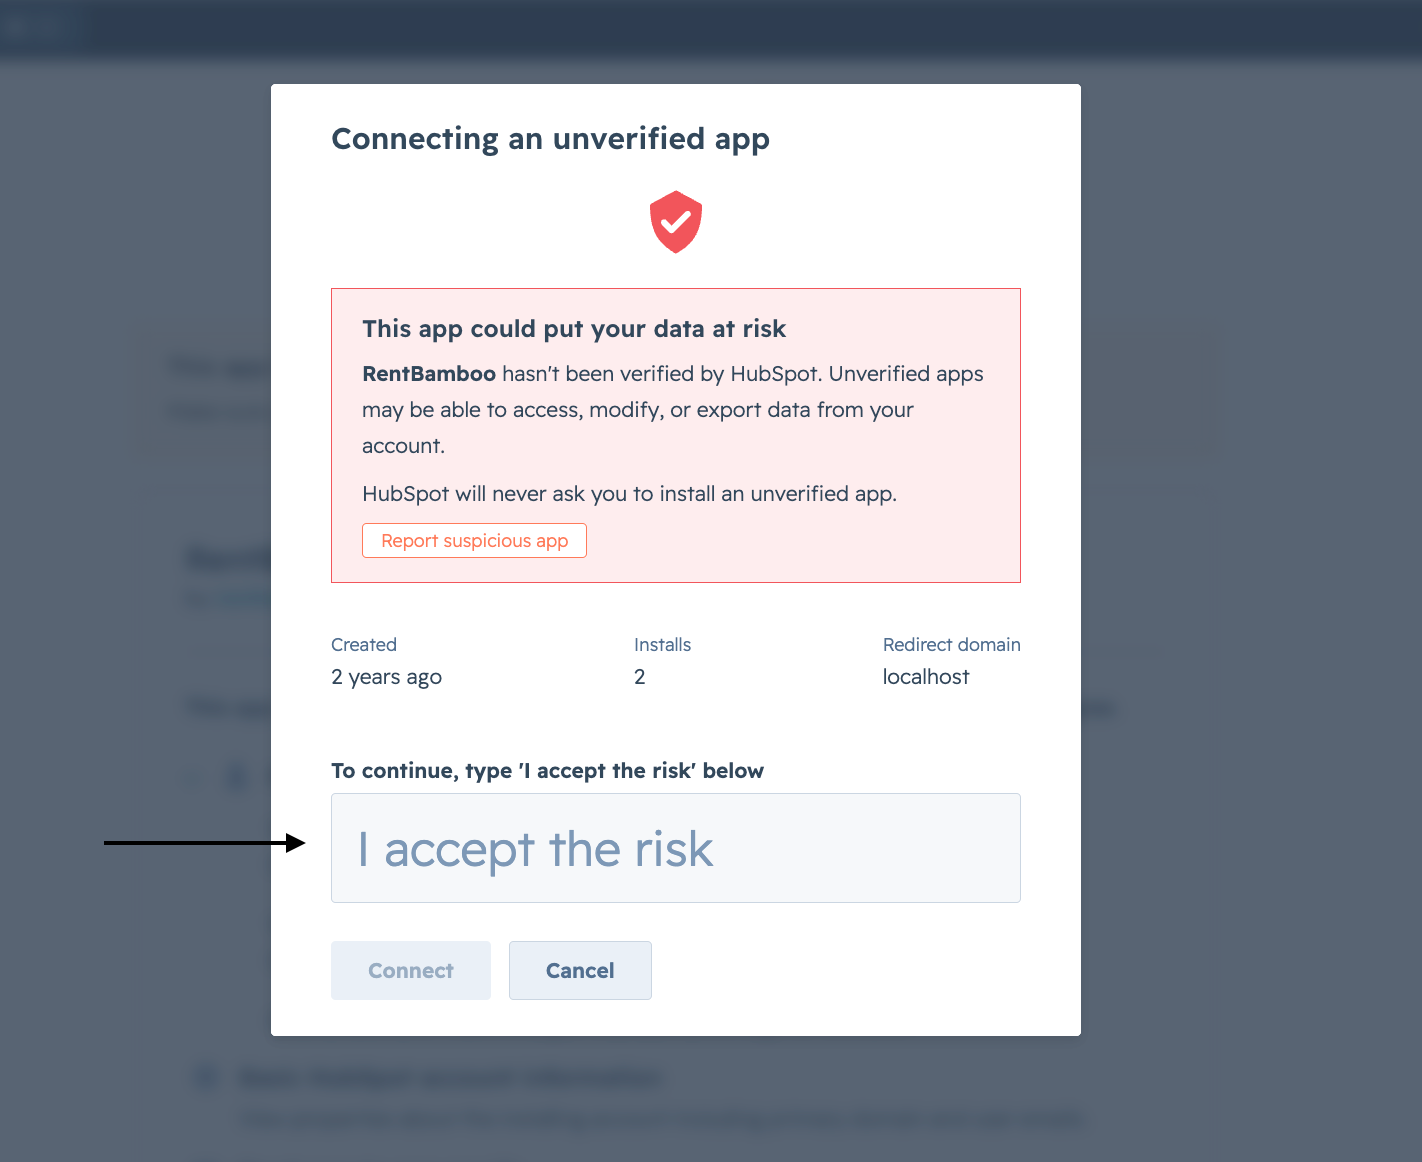
After you type and click Connect, You'll be redirected back to RentBamboo - you should see "Connected" status
How to Set Up Mappings
On RentBamboo, Go to Dashboard → Settings → Integrations → HubSpot
Scroll down to the Status Mappings section
Click on + Add button, you will have 2 drop-downs appear on the left and right.
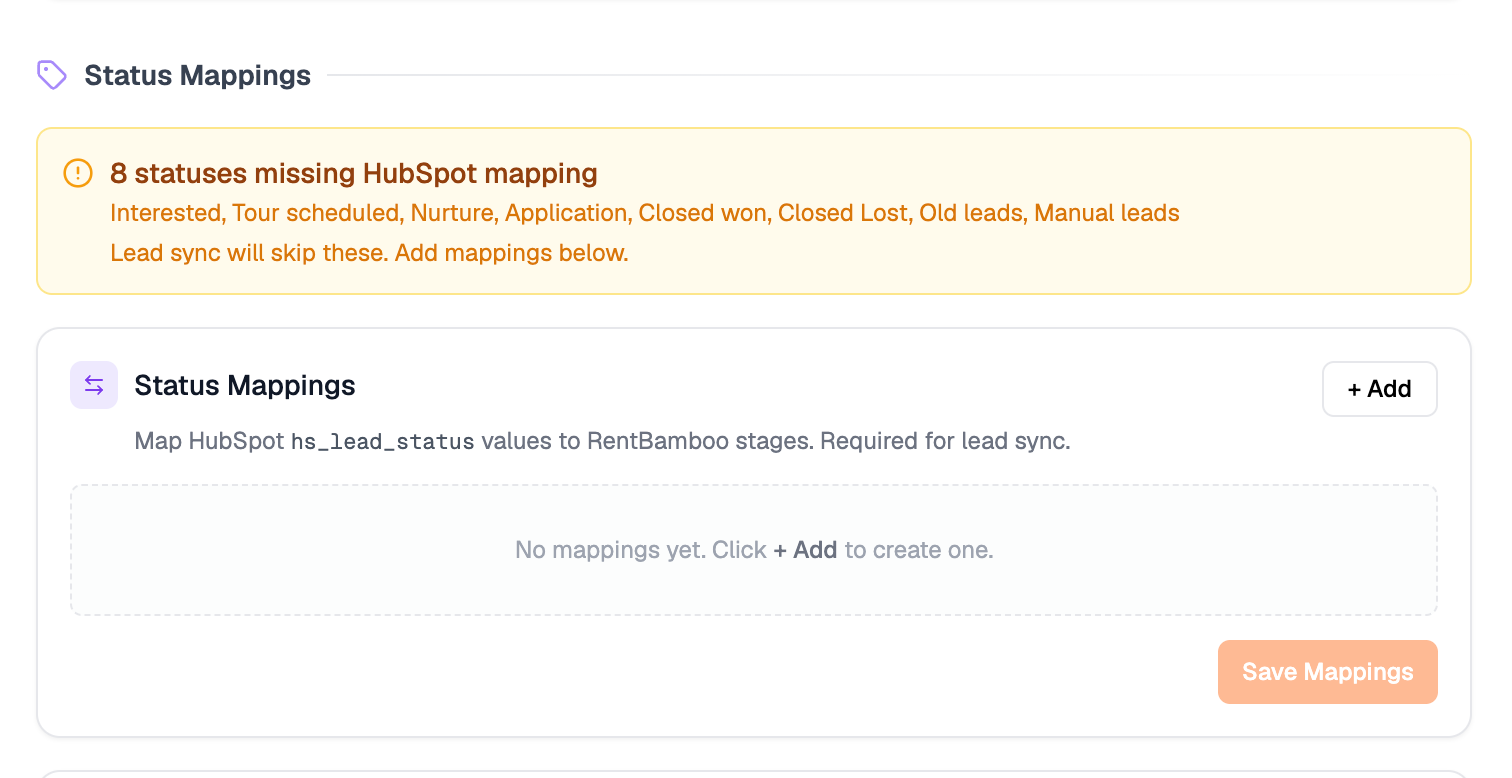
In the left dropdown, pick a RentBamboo status→ In the right dropdown, pick a HubSpot status
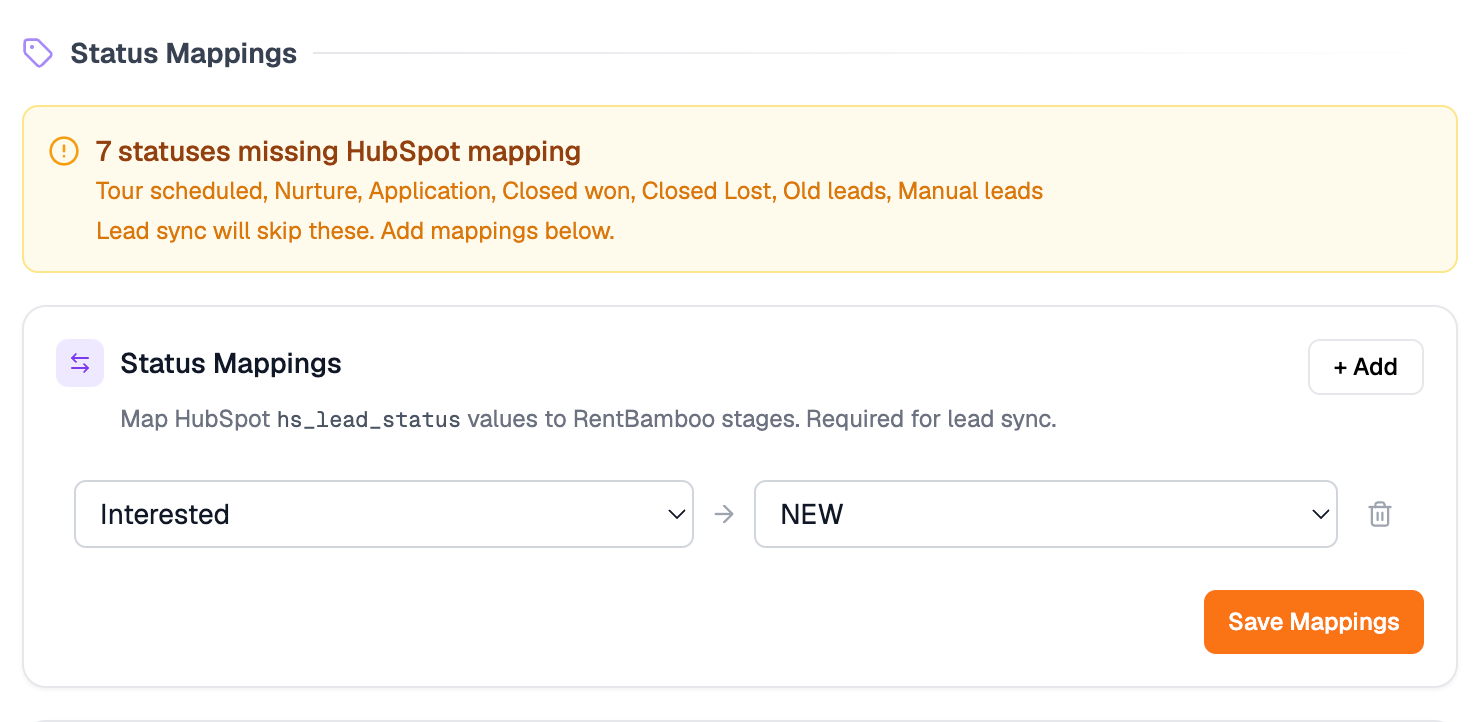
Repeat for every status your team uses
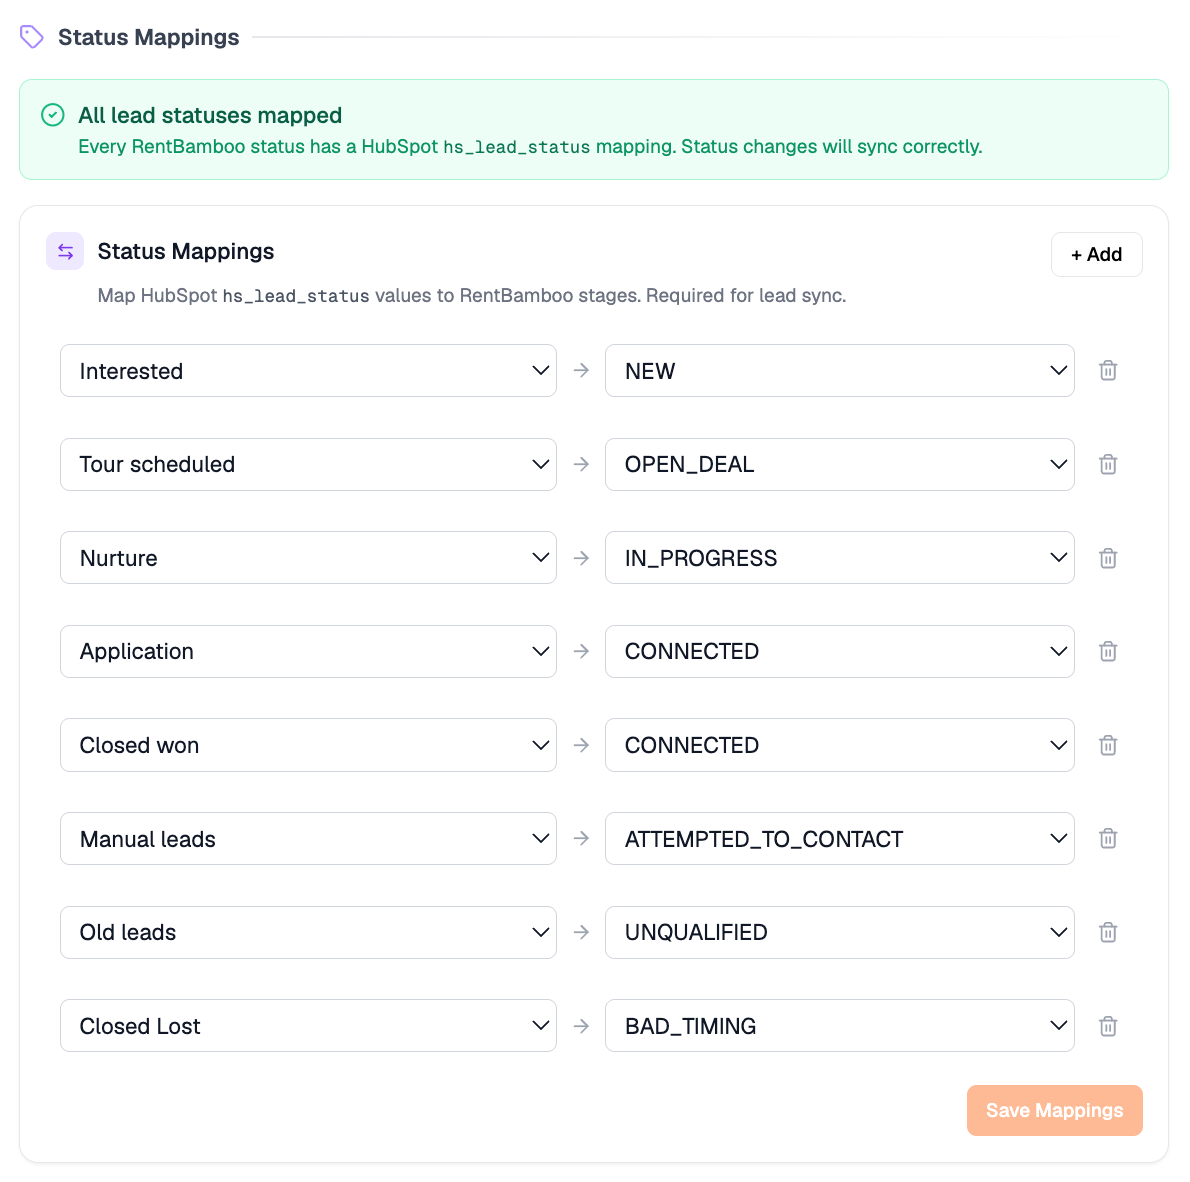
Any unmapped statuses will show a yellow warning banner - status sync will skip these until you map them or might cause errors. So to be SAFE match every lead status you use on RentBamboo to a status on HubSpot, until you see a green sign saying “All lead statuses mapped”.
Click Save Mappings once done.
For Example, here are my mappings (can differ):
BONUS: Setup Similar status as RentBamboo on HubSpot.
Click on the three vertical dots beside the Add contacts button
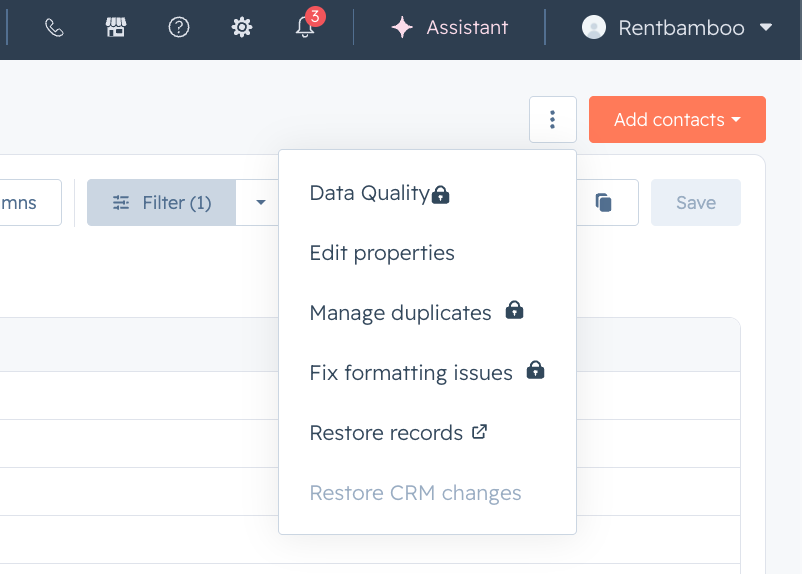
Click on Edit Properties option.
You will go to the Properties page.
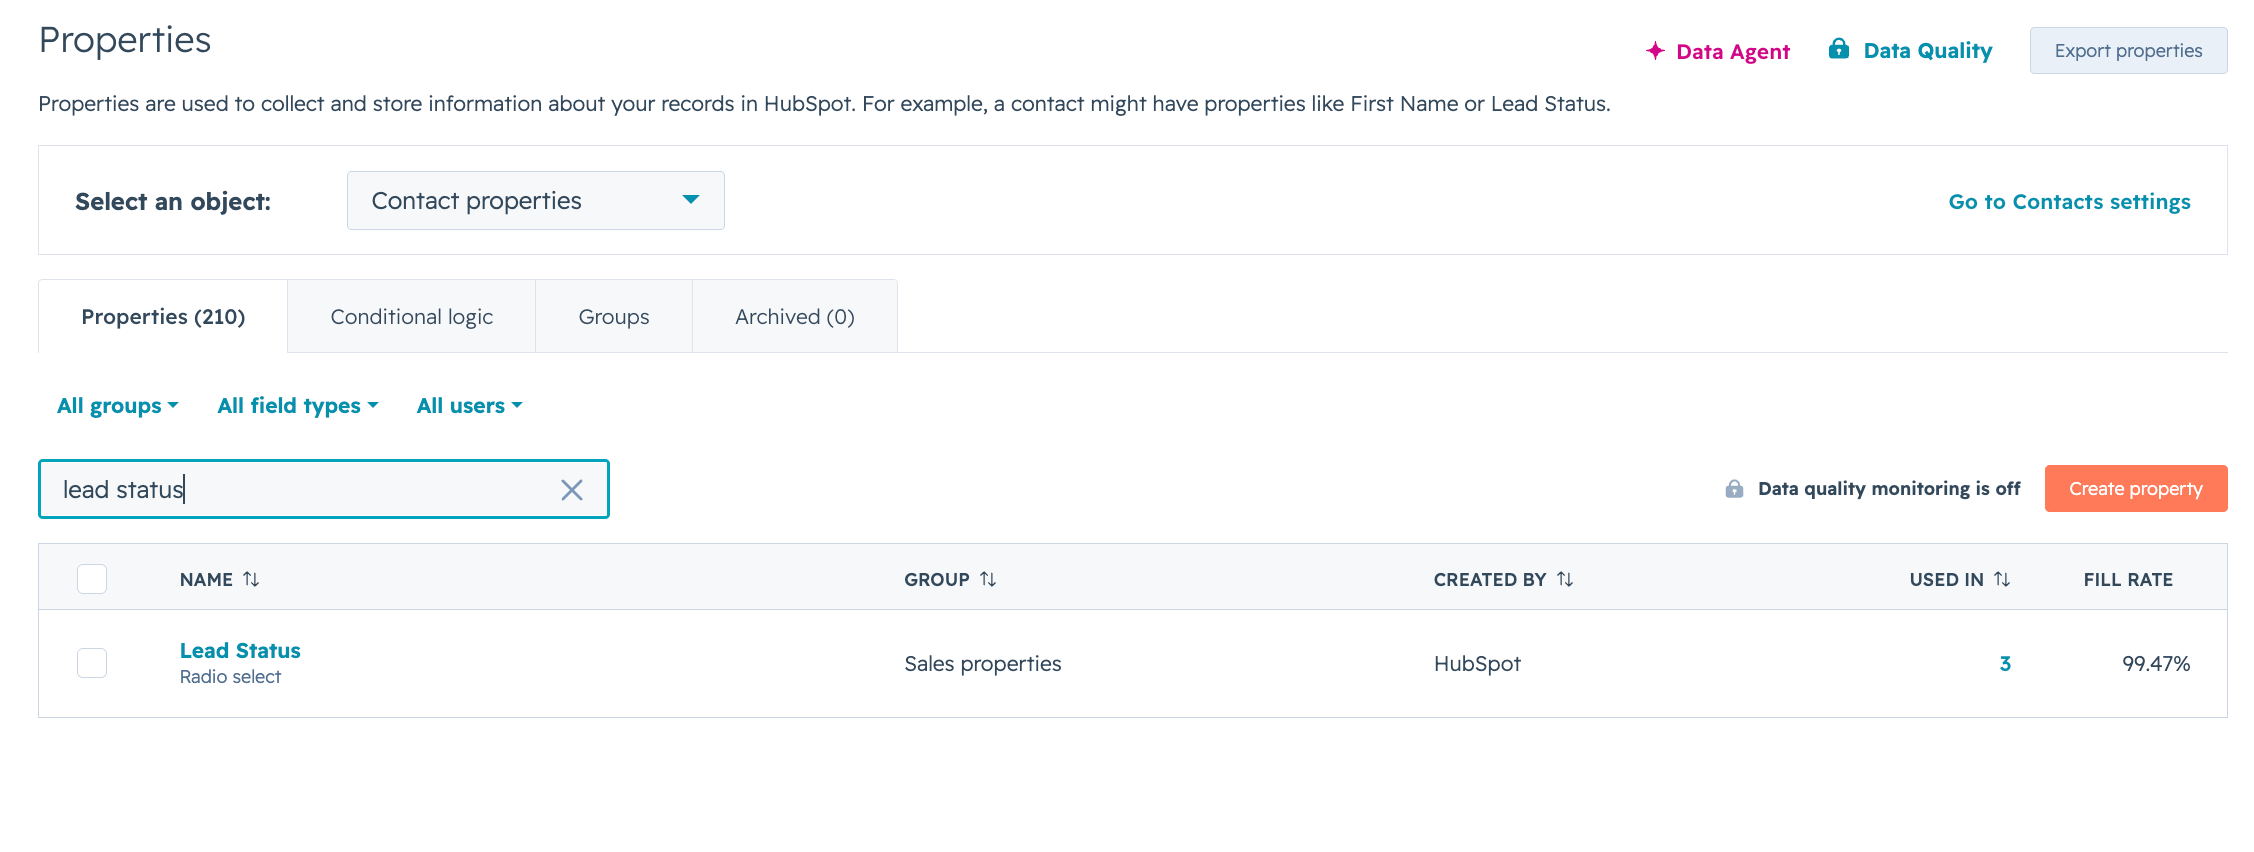
In the search bar, type lead status, and click on the first search result Lead Status (radio select)
Click on Field Type on the left sidebar
Scroll down to find your Lead Status choices available on HubSpot.
Here are mine :
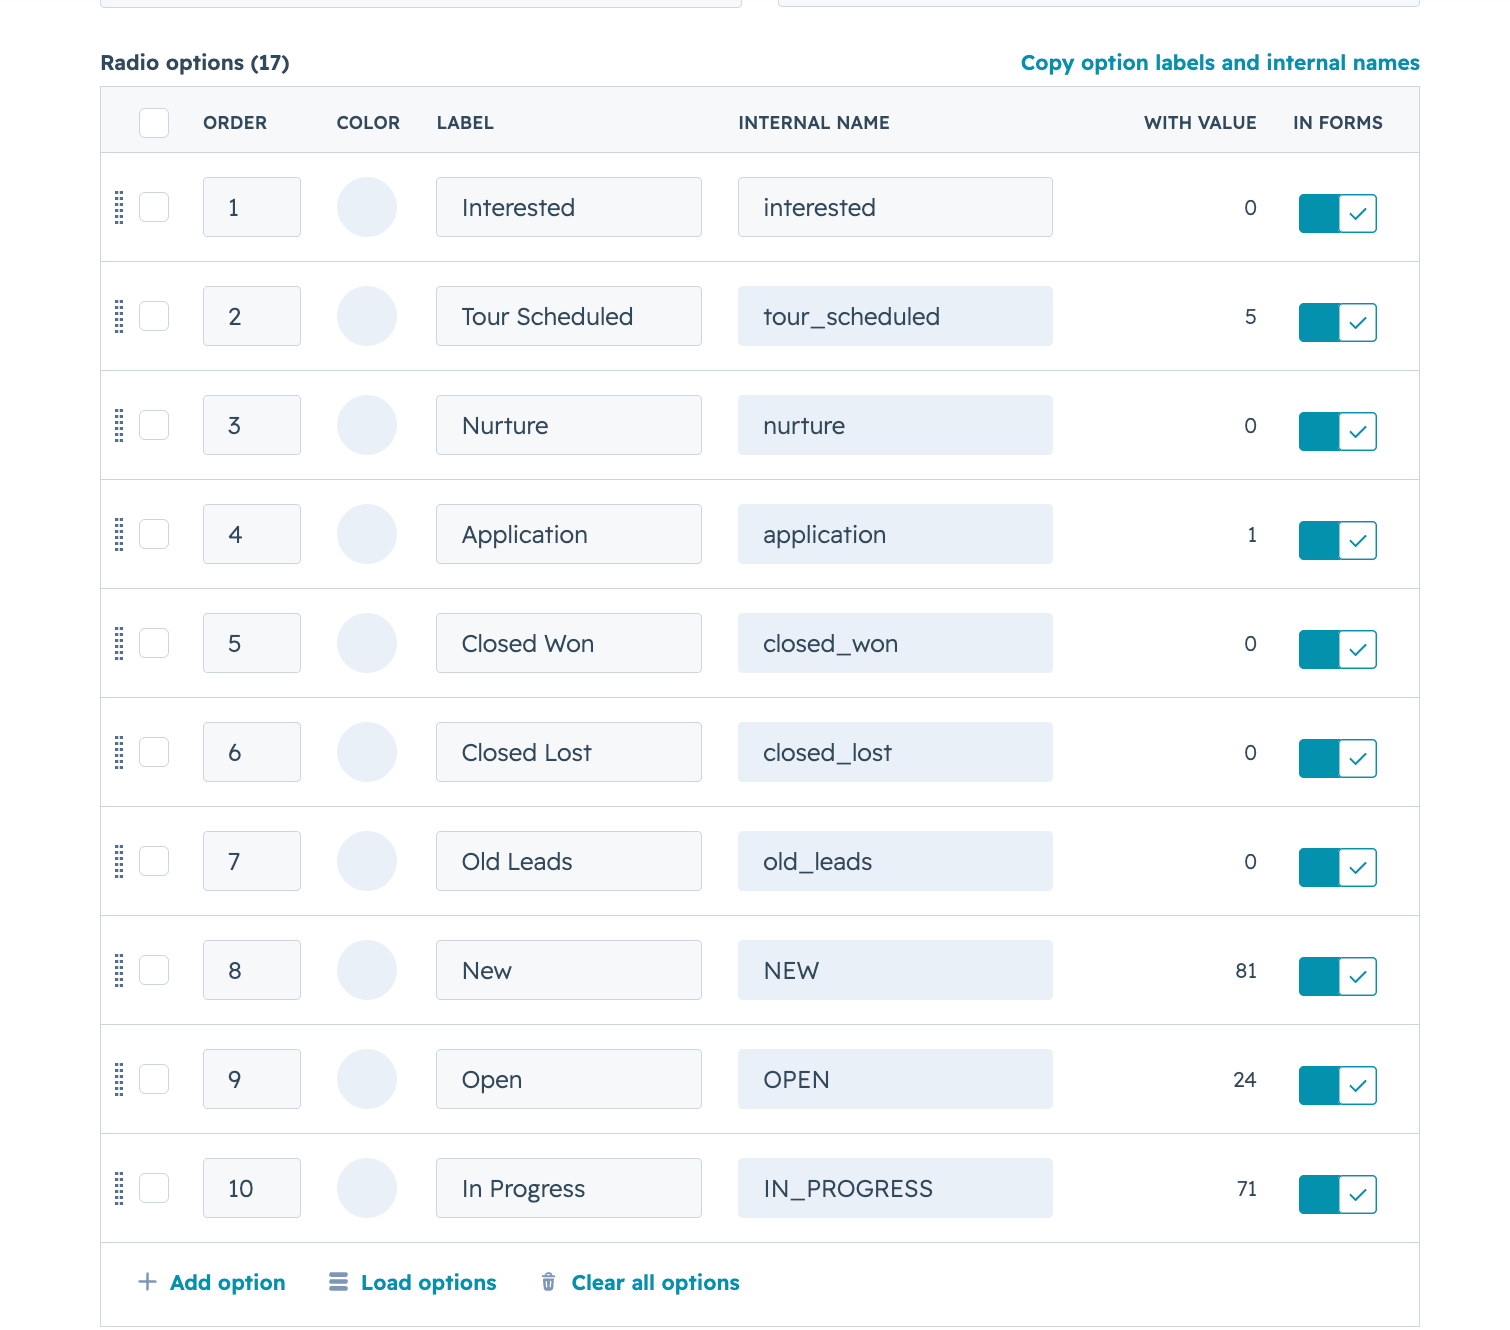
Now, click the + Add option button on the bottom.
Once clicked, you will be prompted to enter a Label and an Internal Name
For Label you can enter Interested and for it’s internal name you can enter the same but lowercased and _ for space… in my case just lowercase as it is one word - interested
Now make sure internal name is always lowercase, and for space between words add an underscore instead. You can refer my radio options I have setup in the picture above.
(The internal names are capitals and native to HubSpot, so we don’t touch that)
So once setup, do not forget to click the Orange Save Button on the top right of your screen. (Do not forget this, or else HubSpot wont take your changes of options into effect.)
- - -
Example for two words:

Click on the Orange Save button on the top right, to save once done. (Do not forget)
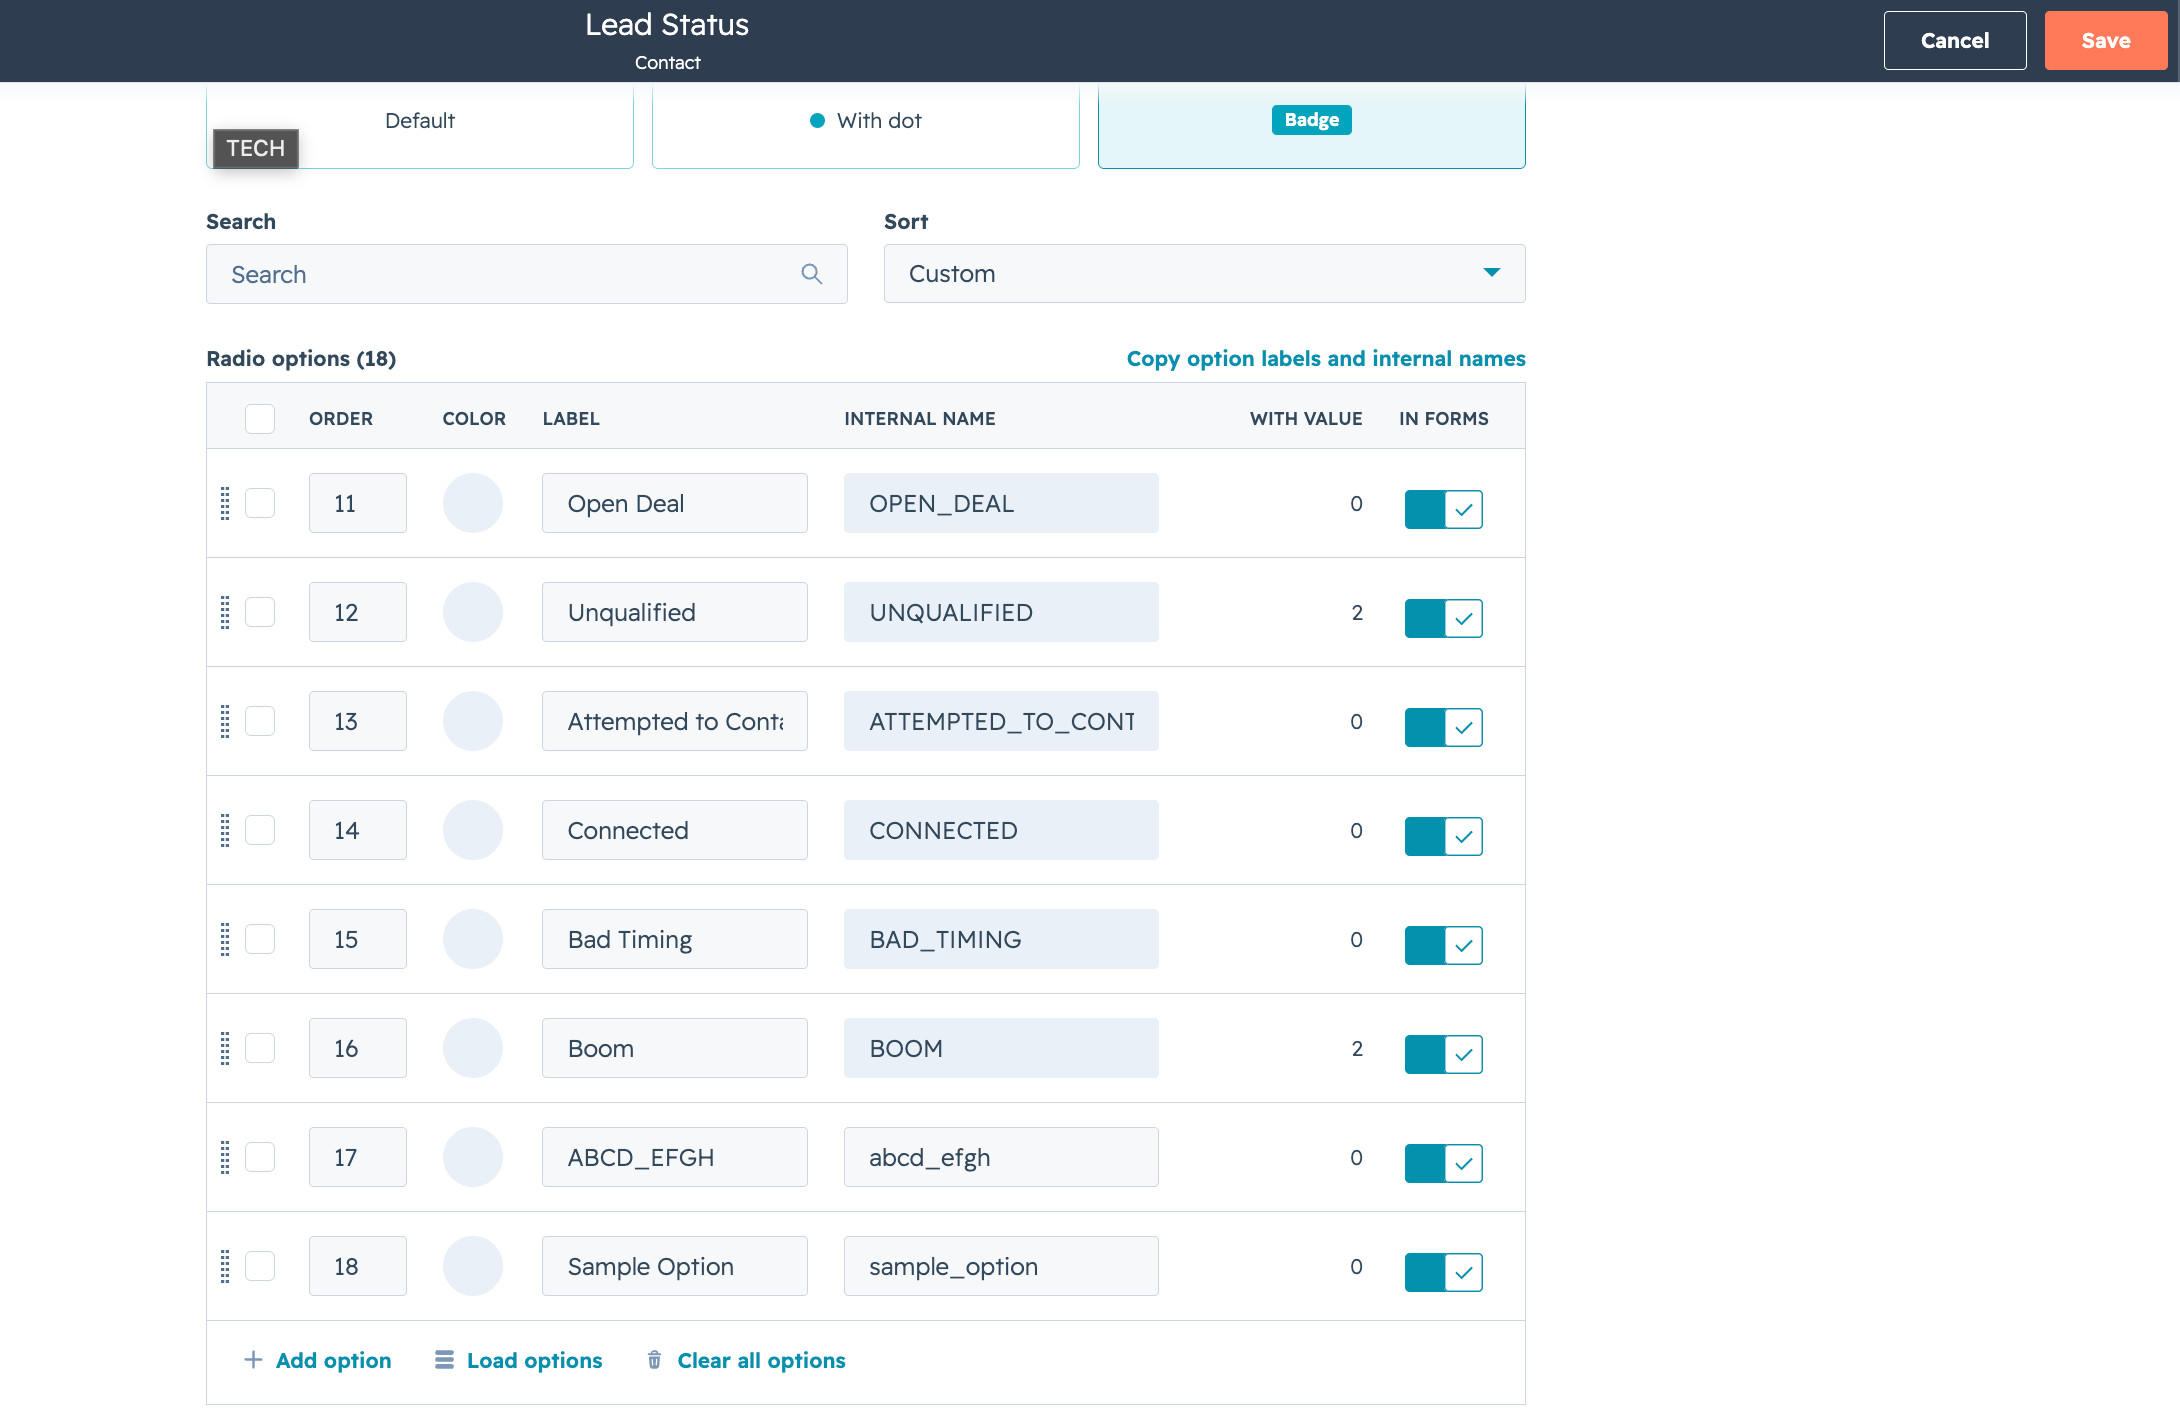
So now after setting it up, it is identical to RentBamboo’s statuses.
Now I can go back to RentBamboo’s Status Mappings, and here’s how it looks - matched with the latest statuses we just made.
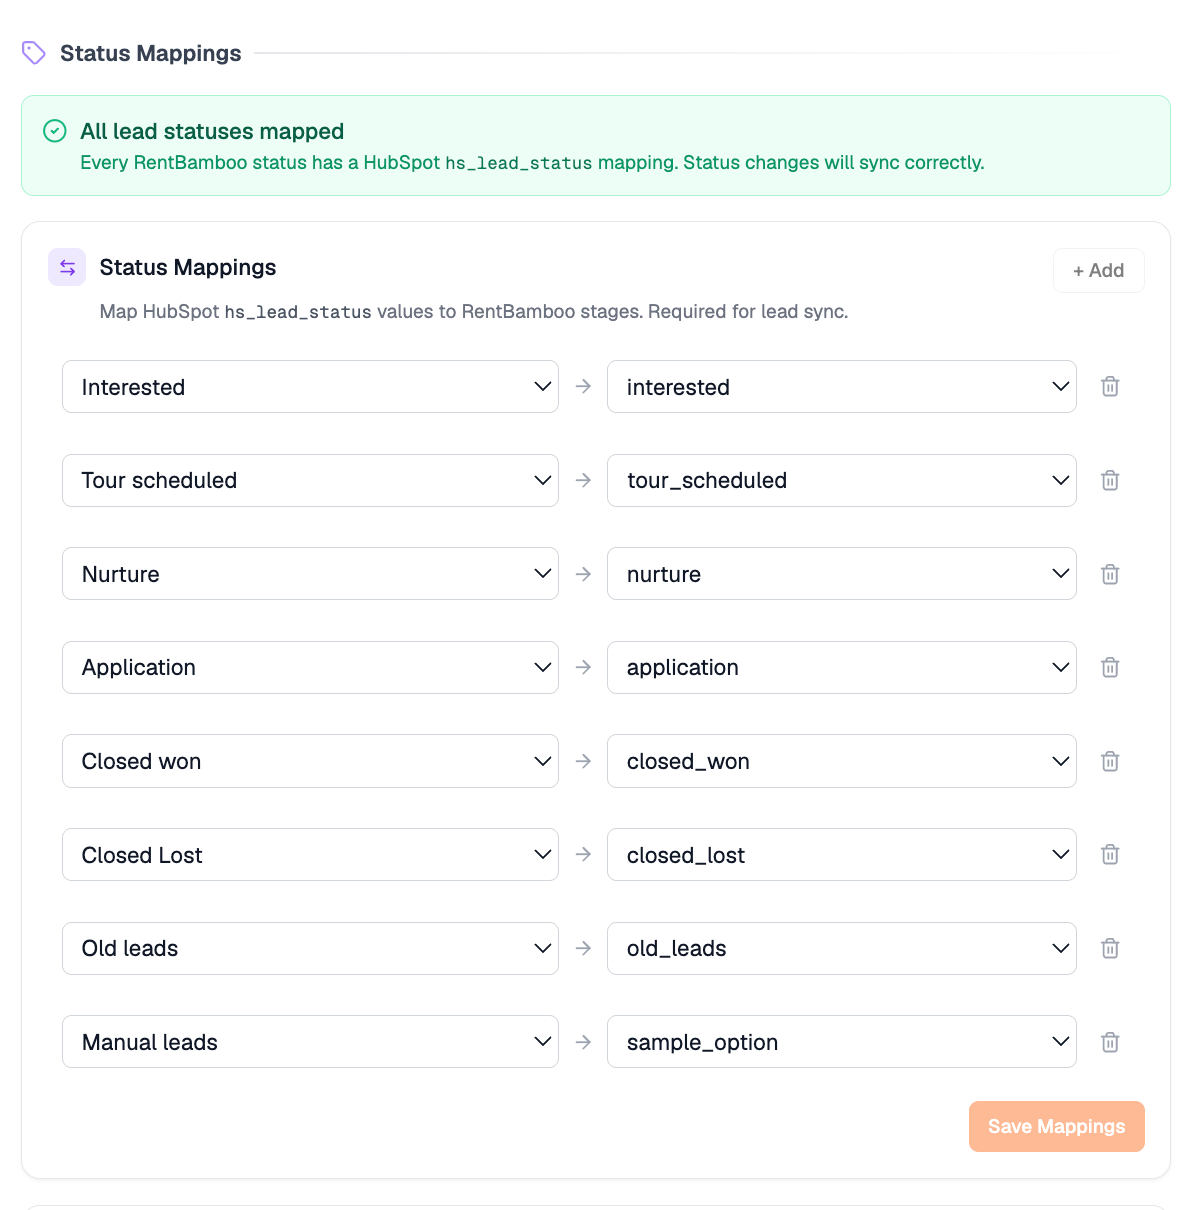
Neat isn’t it?
If this is not configured, all leads will sync in both directions. HOWEVER, you'll have less control over lead ownership and assigned property owners in HubSpot, so this setup is highly recommended.
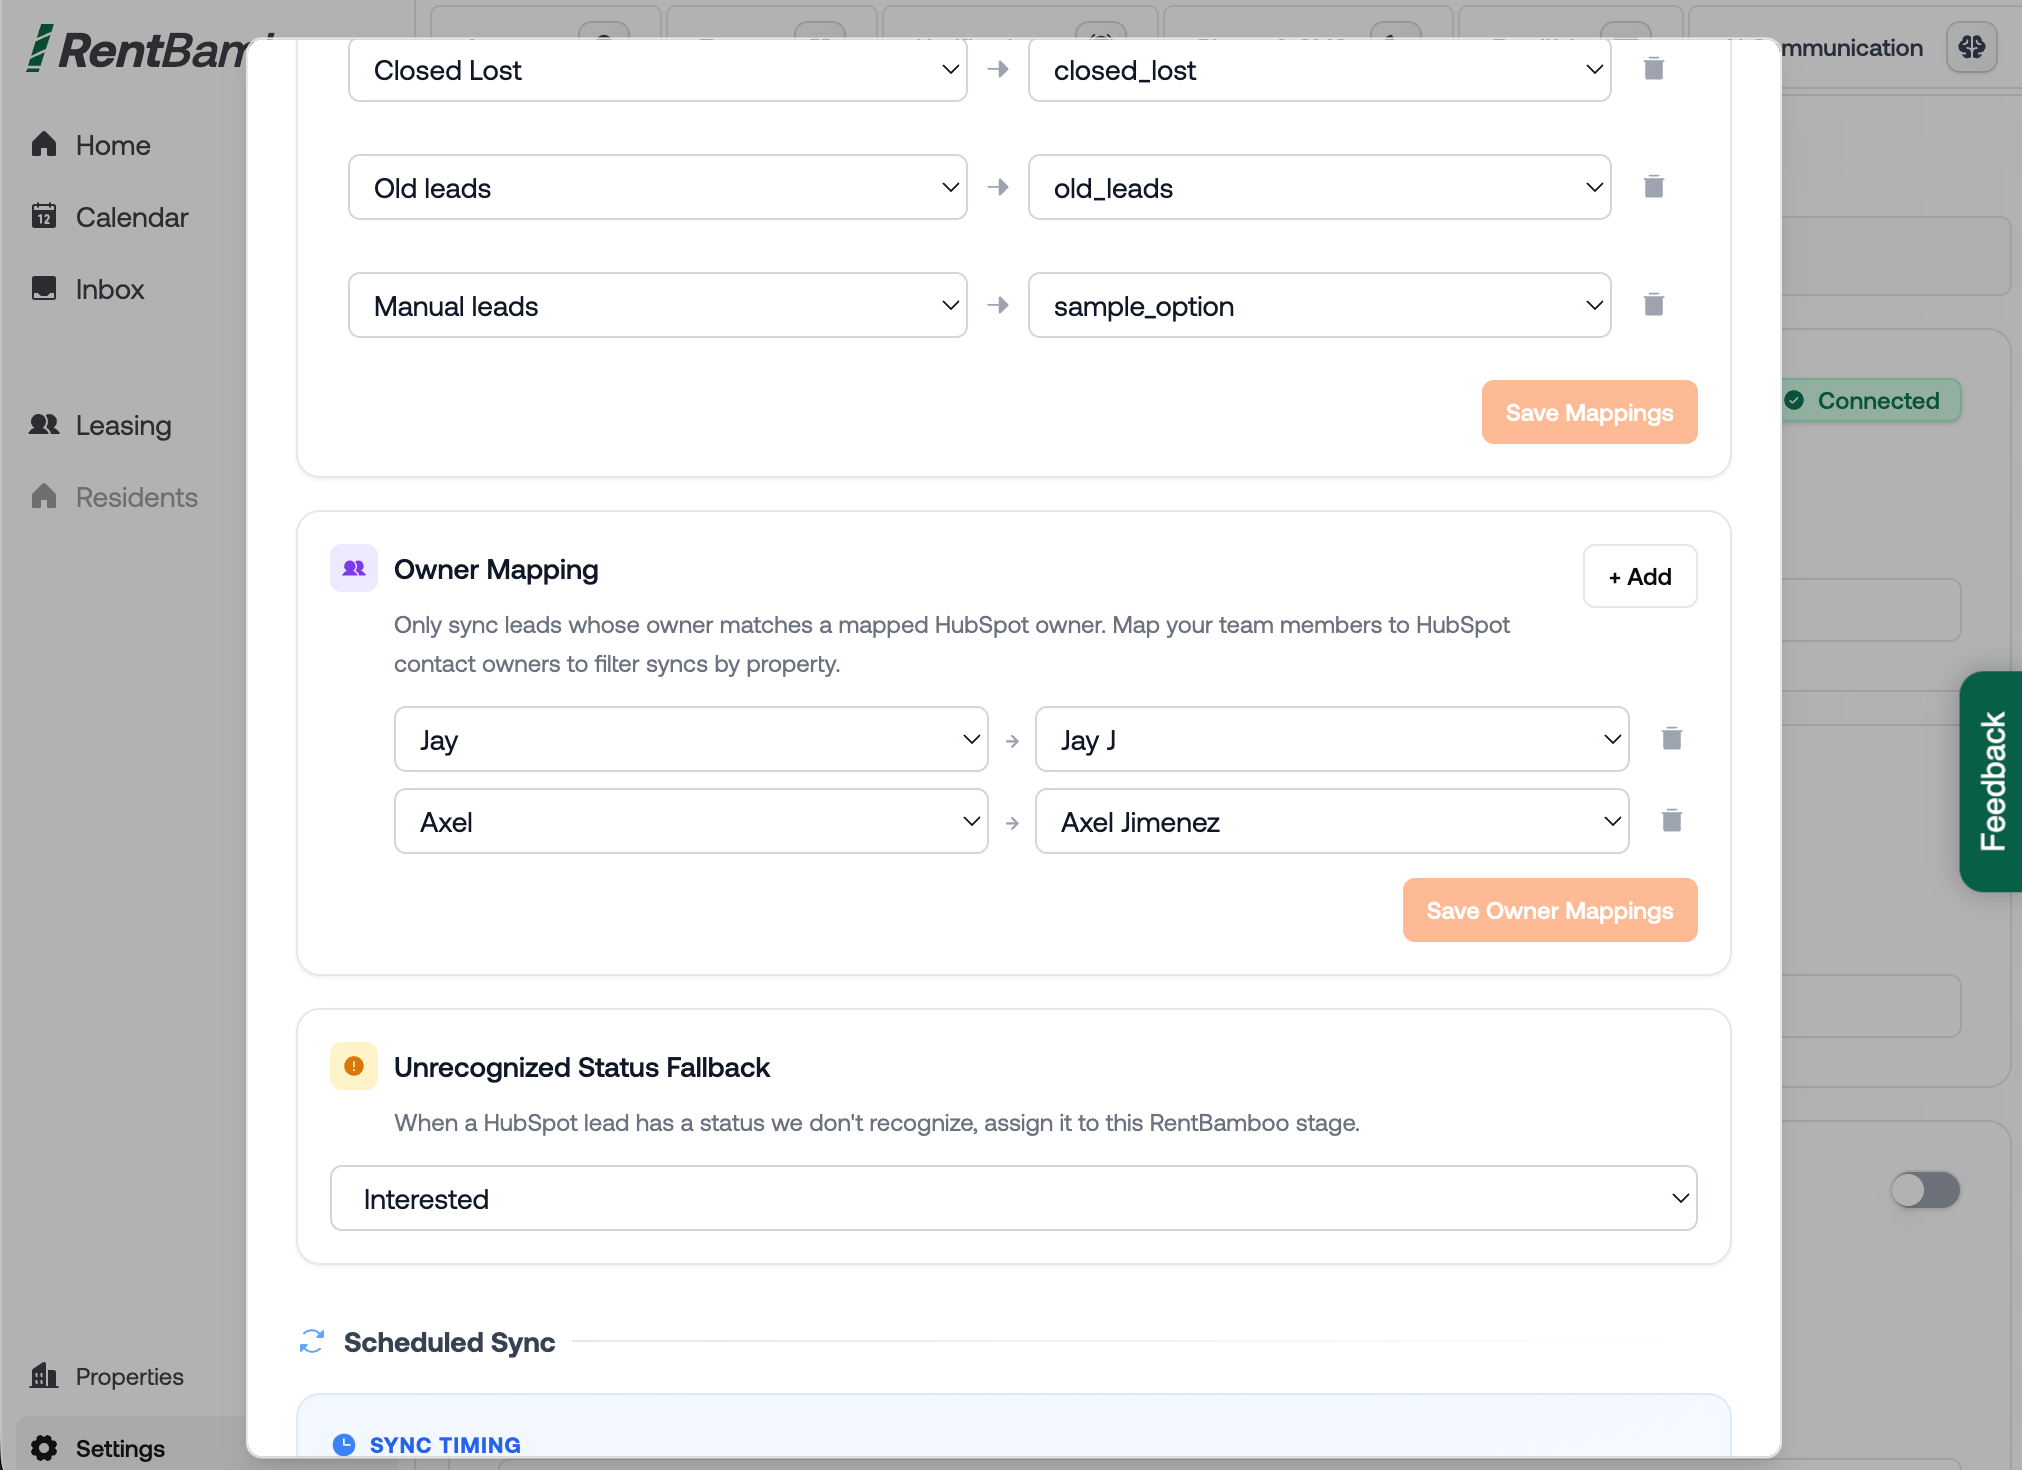
If your team manages multiple properties on the 1 HubSpot Contacts CRM, you map each RB team member to a HubSpot’ contact owner / assigned property owner. Only leads belonging to mapped owners sync. Unmapped owners’ leads stay in RB and never reach HubSpot.
- When owner mappings are configured, ONLY mapped leads sync both ways.
- When NO mappings exist (empty), ALL leads sync normally.
- Owner changes flow both directions:
RentBamboo Lead Owner changes → HubSpot Contact Owner updates
HubSpot Contact Owner changes → RB Lead Owner updates
1. Scroll to Owner Mapping section in HubSpot settings
2. Click + Add
3. Left dropdown → pick a RentBamboo Lead Owner / Team Member
4. Right dropdown → pick the matching HubSpot owner
5. Repeat for every lead owner / team member
6. Click Save Owner Mappings
This is a manual, on-demand sync. Use this to bring in existing HubSpot contacts as RentBamboo leads.
Click Import from HubSpot in the HubSpot settings page
RentBamboo fetches all contacts from your HubSpot portal (paginated - handles thousands automatically)
A preview modal shows all contacts with their name, email, phone, and HubSpot status
You can select/deselect individual contacts
Click Import Selected - contacts are upserted into RentBamboo:
If a lead with the same email already exists → updated (not duplicated)
If no match → created as new
Each imported lead gets tagged hubspot-import and stamped with sync metadata
Push RentBamboo leads to HubSpot as contacts. Also manual/on-demand.
Click Export to HubSpot
A preview modal shows all team leads
Select the leads you want to export
Click Export Selected
Leads are upserted into HubSpot:
If a HubSpot contact with the same email exists → updated
If no match → created new
Each exported lead is stamped with its HubSpot contact ID in RentBamboo for future bi-directional sync
To disconnect cleanly:
Go to Settings → HubSpot
Click Disconnect
RentBamboo:
Revokes the OAuth refresh token in HubSpot
Deletes all webhook subscriptions from HubSpot (using the hapikey)
Removes the stored OAuth tokens and webhook subscription IDs from the database
Now that your data is synced in, let’s train the AI:
AI Agent Introduction
What each AI agent does and how it operates